6 April 2023

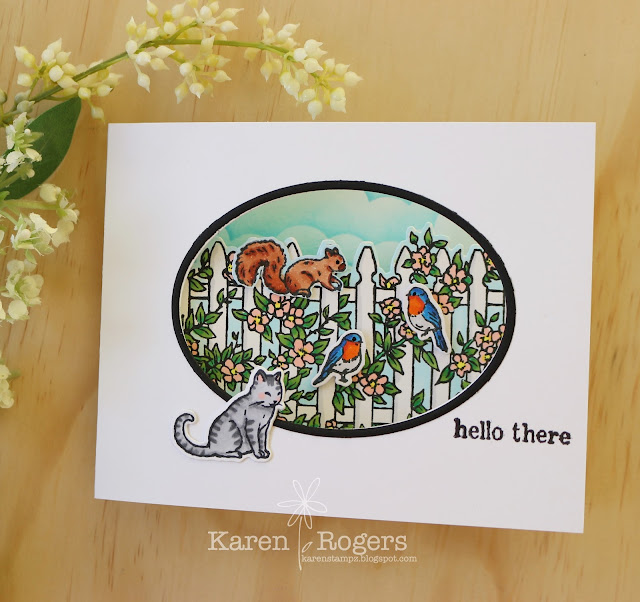
Garden Critters

We got to work with Libby Hickson and one of the new Spring releases from Hero Arts called Garden Critters for my SCT Crop and Create class. To be honest I wasn't sure what I thought of this set, it certainly wasn't one I would ever have picked to buy, but I like colouring wee animals, so that always gets a big tick and the fence with it's die-cut turned out to be a really cool feature so it just goes to show that a good class can open your eyes up to a stamp set. I really liked the clouds, grass and sun all-in-one stencil we received with our class kit too. This was my first class I've done with Libby and she was really down to earth and made whoopsies just like we do too (she ended up with blue grass in her sky). The only bad thing about multiple things on one stencil was you need to use lots of post it notes. I also ended up using my own cloud stencil for one example as the stencil is not long enough to cover 5 -1/2" as we were doing a different orientation than the "norm".


This is what Card one looks like but in reality the front panel is just the fence, so the card opens upto reveal this:

The second card is similar but we used the oval dies we received in our Brutus Monroe class kit and the fence inside the card is popped up:


This is the card I used my own mini cloud stencil from MFT for and even though the grass side of the stencil wasn't long enough either it was easy enough to continue on with blending more grass. Libby said she learnt this fold/pop-up element from Jennifer McGuire, in essence we scored a 4-1/2" x 3" piece of white card stock on the longest edge at 1", 1-3/4", 2-3/4" and 3-1/2". Then we cut the piece in half on the shortest side at 1-1/2" to give us 2 scored pieces of 4-1/2" x 1-1/2". The box that is formed the longest side is attached to the card.

The last card was also a cool technique we made paneling using matching pieces of 1/2" card stock. We were given a half piece of an A2 Mist cardstock but I cut my pieces as if I was making a portrait card not landscape. It didn't look right with the oval cut out from card 2 so I just used my Balmy Blue (SU!) cardstock that I own.

This is what we received in our class kit. The stamp set has matching dies for everything apart from the words.

I only own one Hero Art inkpad, their granite so I used a combination of my Pinkfresh Studio inks  (Fresh Pear or Meadow, Grassy Knoll and Summer Shower) and Catherine Pooler inks (Apricot and Chiffon) for my blending and I've coloured in my images with my Copics.

The only thing Libby asked us to do before we started working with the stencil was to work out how the sun mask fitted in, she suggested using washi tape (I used one of my purple tapes) to mark a ray and where it fitted in for our class. As rubbing alcohol is the method of cleaning stencils nowadays it wasn't a long term fix, suggestions from the group was to use nail polish which made me think of my White Posca pen which seems pretty permanent IMO.

Last but not least Libby's sneak peeks for us pre-class.


#cropandcreatedelivered #SCTbigboxevent


✿ Karen ✿

5 April 2023

EZ with CZ

Good morning sharing another fab class from my SCT Crop and Create event, Cathy Zielske always get the short straw and kicks of one of the days teaching us our Concord and 9th (C9) class. It is expected she is bra-less and no hard pants and now it is also expected she sings us a song too and she did not disappoint, she is a real crack up. As well as being a fab card maker or maybe the reason she is so fab is she is a graphic designer by trade and her cards always pack a wow.

This was one of the classes I was really looking forward too as the sneaks we had seen looked fab, there were a lot of postage stamp vibes going on - this was something I did not have anything like it in my stash. C9 are always generous and seem to give us 6 mini ink pads so I now have 12 in my collection, this year we got to play with four of their new colours that are being released April 10th in the States.


Again lots of stenciling happening "this is the year of the stencil" I thought the last 2 years were big but I think it is getting big biggerer! But what a lovely collection of cards with lots of things going on, even the totally stenciled card with the lighthouse and sun is on the big postage stamp die-cut with a wee flower die-cut in the corner. 

My stamping buddy for the weekend wanted to create a red lighthouse but I was happy to play with the new inks we were provided but someone in the FB group created their lighthouse with C9's Honeysuckle ink and I want a Honeysuckle lighthouse now!

The second card was easy as all the stamped flowers and leaves had already been stamped and die cut out as part of our prep work for the class. The glitter drops are added by me as my Butterscotch glitter drops from PFS matched the new colour Spiced Cedar beautifully. 

The stripe is created with the stencil and the 2 new inks Nectar and Spiced Cider but you really need a stamp positioner in fact a MISTI if you want to do this perfectly, I managed to sell Sarah my 2nd mini MISTI after this as she owned a Stamp-aratus but she could see how the wee MISTI is perfect for sentiments and small details like this. I only owned 2 minis as I mislaid my original and even though I own a full size one I love my mini MISTI so much I couldn't live without it. Funnily I only found the missing one as I was really tidying up my craft room so Sarah could craft in my space with me for the weekend.

The big postage die-cut has been trimmed to make our panel and the other wee detail is the watermark peeking out from under the flowers.

The last card we got to make lots of small wee stenciled backgrounds and then die-cut out as "stamps" and lots of details added ie wee stamped messages and wee die-cuts.

This was fun and yes it was EZ as CZ!!

Here's Cathy's sneak peek and I am happy I did her proud:

The wee inkpads we received, buttercup and parsley are part of their current range and the other 4 are coming for release April 10.

And the rest of the kit (plus not photographed we also received some matching cardstock for the card base and making flower die cuts).

#cropandcreatedelivered #SCTbigboxevent

✿ Karen ✿

3 April 2023

Envelope pop up cards

This is my Pink and Main class from the recent SCT Crop and Create event. We received a 33-piece envelope pop-up die set. YES 33 PIECES!!

I love Pink & Main dies; they are bright pink so if you drop a piece they are normally easy to find. 

We also received a rectangle patterns stencil and we used all the patterns bar one, a stamp set, patterned paper and a zippered mesh project bag. Again the company was so generous and this will be one die I will be revisiting again, lots of examples for Easter popping up in our Facebook group already.

The class was taught by Michelle Currie and this was the only class I have done so far where I was waiting for her to catch up to me! So a nice manageable pace, all my die-cutting was done as part of my homework.

She also showed lots of cool other ideas other than the 3 cards we were being taught, so I created another 2 cards as well. Michelle made her own coloured card stock using her alcohol markers to make coloured card for her diecuts that was close to the patterned paper they gave us. I just grabbed offcuts and scraps for various colours I thought were a close match and that was really easy!

The official 3 cards:


2 of the cards were freestanding envelopes and the die created a middle layer, my snap of the "inside" is terrible but I'm sure you can get the idea. And yes they fold flat to go in an A2 envelope.

We had to use 110-lb weight card stock for our layers to create the "envelope" and the patterned DSP they provided was also a real heavy weight, which is why these are so sturdy.

We used the stripes stencil for the notecard and I used my Daffodil Delight ink (SU!). Card stock for the diecuts, I used Melon Mambo, Polished Pink, Mint Macaron, Daffodil Delight and Starry Sky (all SU!). The sentiment comes from the stamp set we received called Sweet Posies, even the banner die was part of the envelope die set.

The other envelope die was "masculine", colours as above and I used some scraps of a mint glitter paper I had in my scrap box. This time we used the spots rectangle stencil for the notecard.

I really liked the flower dies we received they were a great size and certainly made cute flowers with them. This card was so easy to create, aren't the word dies also awesome. This is the 3rd pattern from the stencils (the only one we didn't use was the honeycomb).

Last but not least 2 extra cards, casing her extra examples she shared.  The envelope this time has the side folds cut off and added to an A2 card front.

The patterned paper we received from Pink and Main was very bright and cheery and looking through my stash I spied these two which are retired DSP from SU!, neither I really liked but they worked together. They were called Abstract Beauty (lining) and Artistry Blooms (on the outside of the envelope). Colours I used matched the DSP so Mango Melody, Melon Mambo, Balmy Blue, Night of Navy (all SU!) and my scraps of mint glitter paper for the heart. The glitter drops are Pinkfresh Studios Twilight Ombre glitter drops and they are pink and orange IRL.


This is actually my favourite card I just love the bright cheery "Spring colours", blue this time is Tahitian Tide, I have also used Parakeet Party and Early Espresso card stock from SU!, pale pink is Ballet Slipper (C9).


 I have to say these cards make me happy and if you ever see the Envelope pop up die set for sale grab it! With the SCT event a lot of the product is exclusive for the event or we are using them well before they are released for sale but I have seen some products definitely become available from the last one I took part in and so hopefully this one does come on the market as it's a "keeper" all right.


Here is a close-up of the envelope pop-up die set, I cut it so I could fit in the largest Avery Elle pocket as I store all my stamps and dies in fridge bins. 

And the sneak peeks of Michelle's cards:


#cropandcreatedelivered #SCTbigboxevent

✿ Karen ✿