31 August 2023

Finishing off my Big Box from March

Gosh I can see my halo shining from here all my classes from SCT's Crop and Create Cardmaking Delivered aka my big box event are now completed from the last 2 events I signed up for, as I eagerly await the box for the "fall event" which starts 29th September for me. There are a few classes I haven't done that I do not like but after 36 classes over 2 events me not wanting to do two of them I think is pretty good going.

The last class I had to complete was Brutus Monroe with Christopher Allen himself, he's a lovely man but man he can get sidetracked and I did not enjoy his ability to write instructions or teach a card. I think it's the story you have to teach to the lowest denominator which in this case is MOI!


He was extremely generous with our kit swag we got a stamp set with matching dies and also a coordinating stencil, plus also a huge die to create easel cards - now this was supposed to make making easel cards easier, for me it did not but it was a really useful set complete with square dies, round dies and an oval die so really, really useful.

The first class taught was the easel card and I ended up having to tear it all off and die-cutting out another easel card plus I felt it was all too flimsy so I mounted my fancy card front on a black mat for stability. It actually tuned out looking pretty good for all that. We were supposed to blend our inks to make the panels for our die-cut flowers to be die cut out off but I wasn't really that happy so I just used do-si-do ink (CP) to stamp the pink detail on some Chamomile card stock (SP) and ink blended gently around the edges with the pink ink. The green "vine" is Granny Apple Green (SU!). We ink blended a yellow and teal ink for our sentiment and then pressed Versamark embossing pad all over it and I added Holographic sparkle glitter from WOW for a bit of wow as I don't own the product he was using from BM and it was not part of our kits. The pinkish flower die cuts are just the ink swiped on white card stock I added very pale aqua sequins as felt like they needed something extra.


Now card two was really easy the coordinating stencil to match the stamp set made a background so easily, there were 4 layers; one for each colour. I used Pinkfresh Studio inks this time; Sunshine, Clementine, Bubblegum and Aquamarine.


Last but not least is a very clever square card (4-1/4") the first mat which is a 4" square. I have stamped the largest flower all around the edge with Sweet Pea ink (C9). Then a 3-3/4" square mat of black plus 4 large squares of white and either stamped flower images (using the 2nd flower) or die cuts. The die cuts all came from the Easy Easel die. Again I have embossed the whole square with Versamark and added Holographic Sparkle glitter (WOW). Looking at the sneak it looks like I was supposed to do the same to the 2 small black squares.


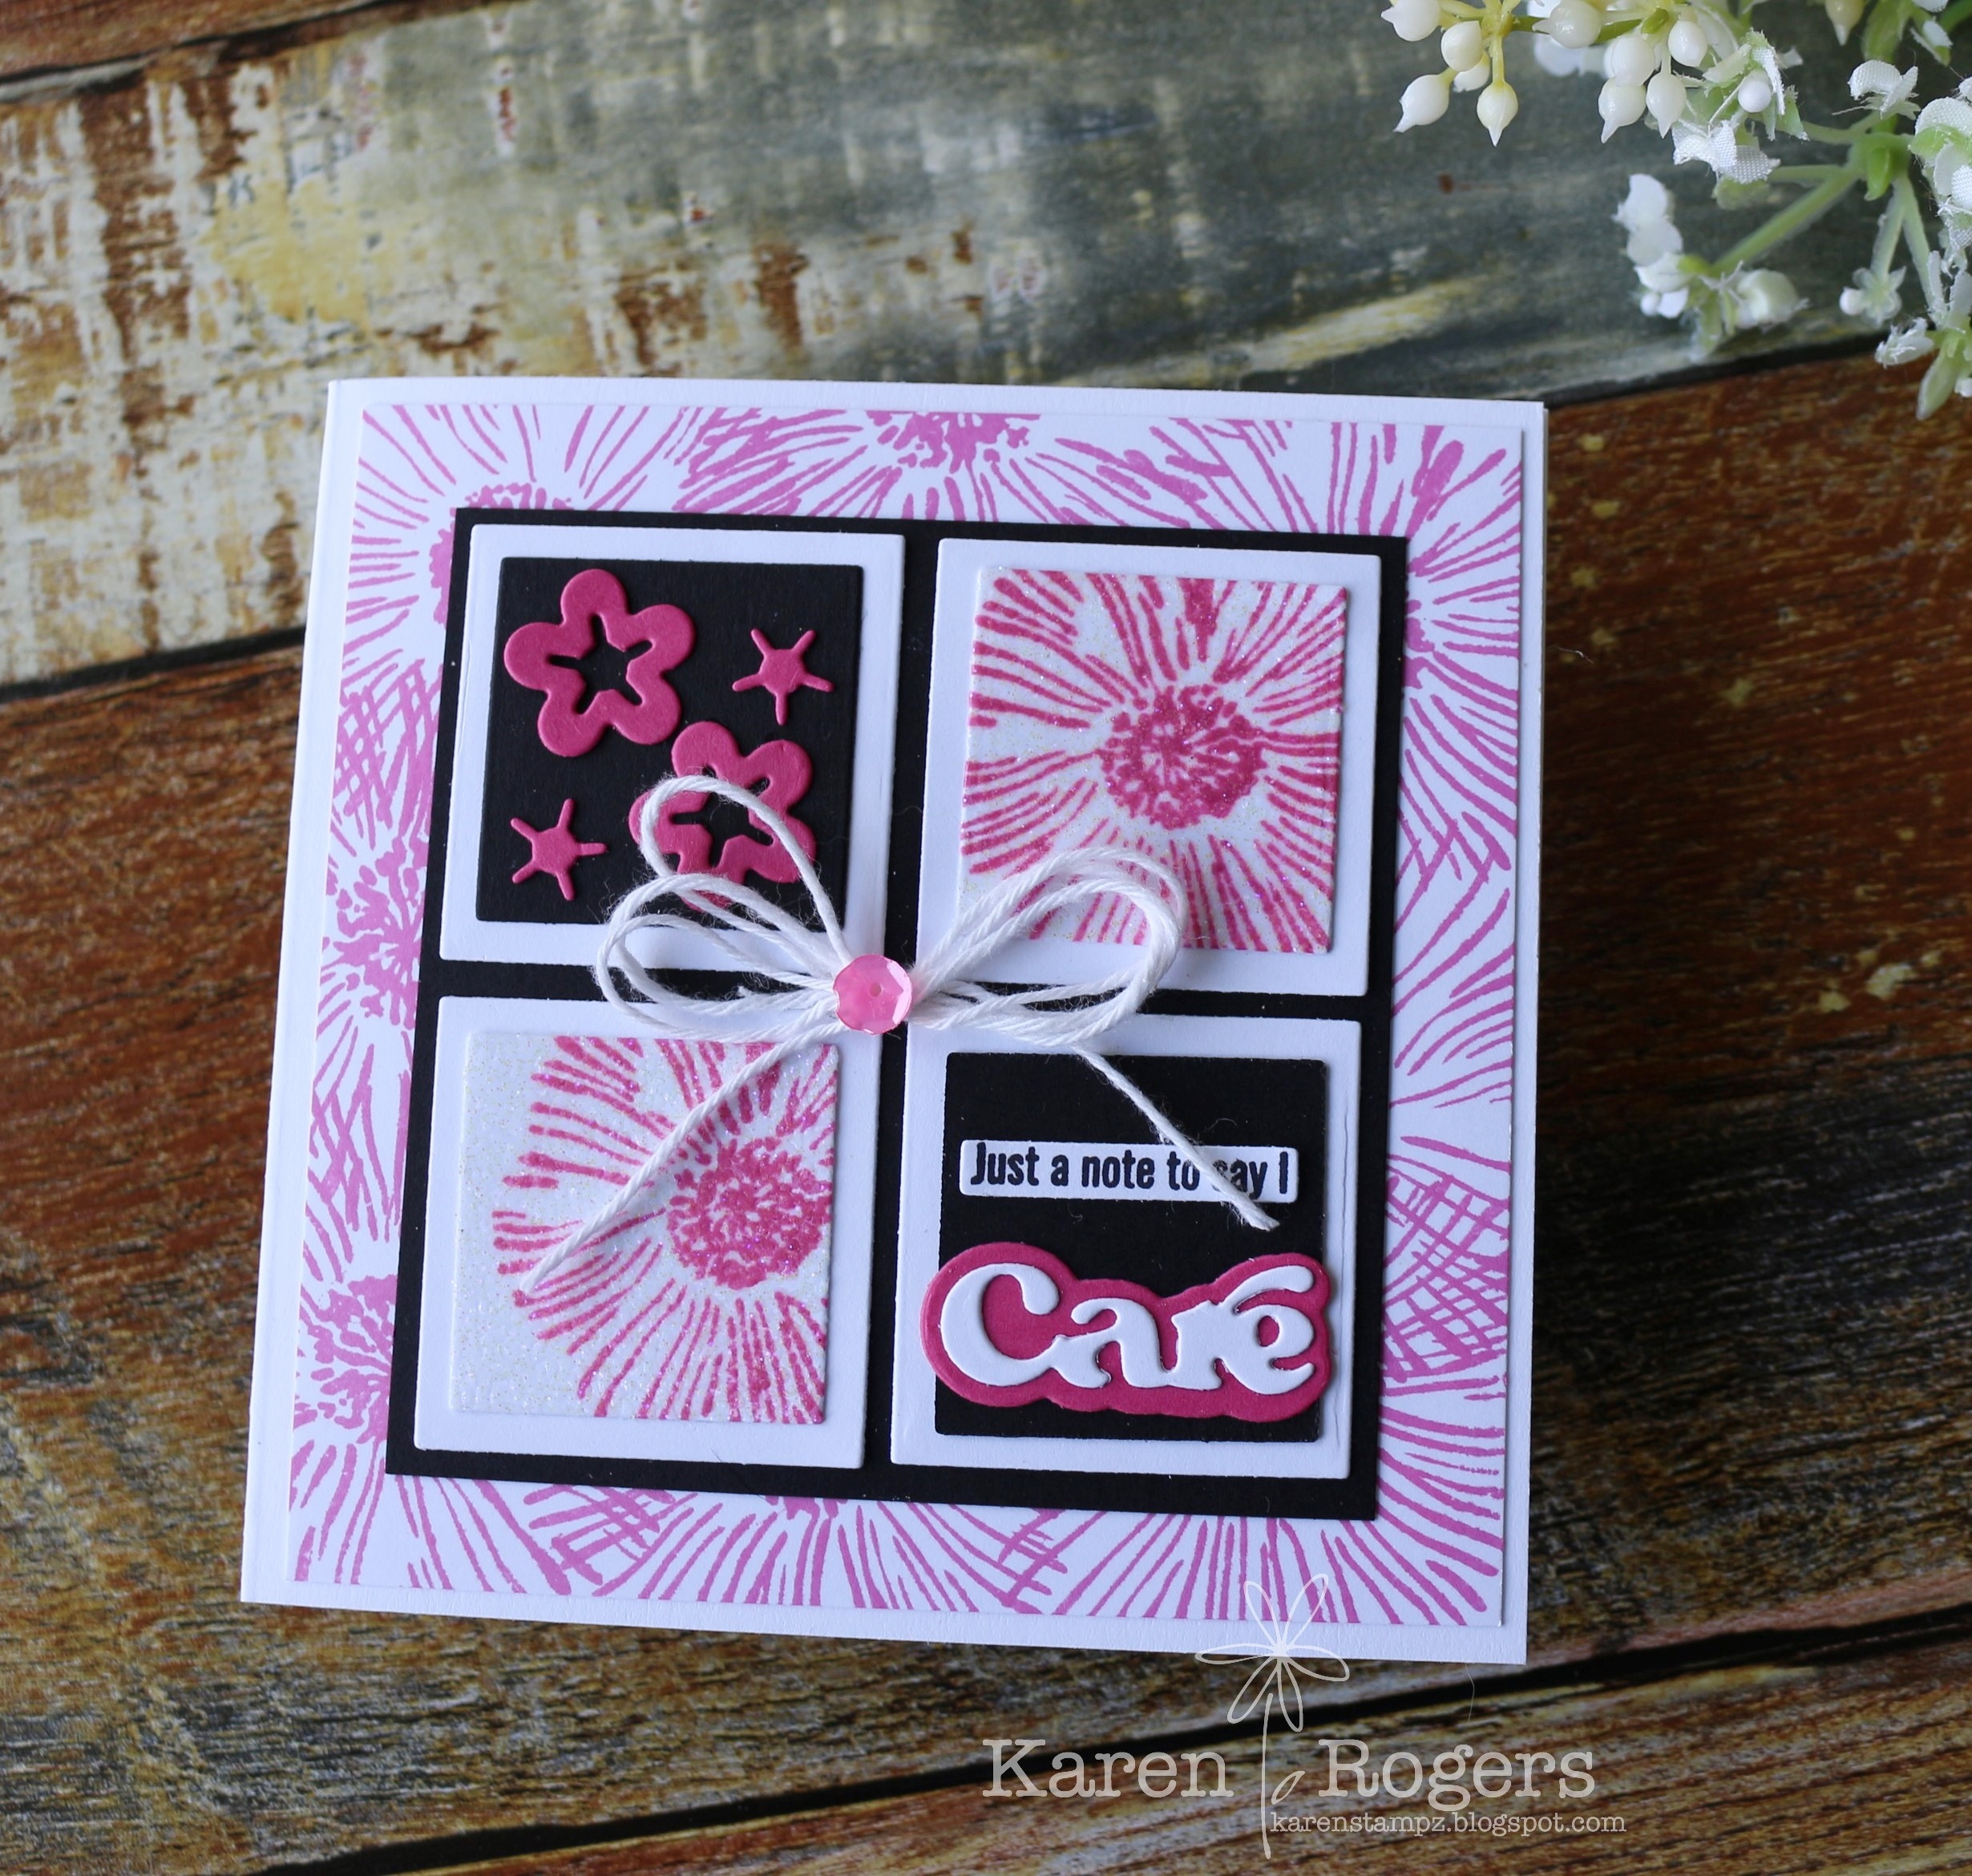
This is actually quite a clever monochromatic card design, so in the end I'm pretty happy with the class.

So as I head into September tomorrow there's exactly 29 days till one of the biggest cardmaking party starts with 3400 crazy stampers from all around the world and the kiwis boxes have just been sent out today. There's 12lbs of "happiness" in each box. If you want to know more about these events which occur six-monthly do check out SCT HERE.


✿ Karen ✿

29 August 2023

A beautiful page by Jessica for Hero Arts

This was the 4th page for my art journal from Hero Art's Mixed Media Stamp a Long. This class was taught by Jessica Frost-Ballas. Jessica's "official" photograph you see online is quite serious; doing a live class with her she is a lot of fun, she loves splatter but she is also very precise. Thankfully she went over the size of the page we were supposed to be doing and OMG I had it slightly wrong, so if you're doing the online class and reading this the correct dimensions for the "homemade" accordion journal are: covers; 5" x 7" with the inside pages; 4-7/8" x 6-7/8"

This means our mats if we use one should be no bigger than 4-3/4" x 6-3/4" so we can close our accordions nicely. Therefore our base card should be 4-3/4" x 6-3/4" if no mat or 4-1/2" x 6-1/2" if we have a tiny mat.

I "heard" the page size and thought that was the size for the paper we are working on. I have cut slivers of 2 of my 3 completed pages and my first page is now the cover and it has the words Create on it, so that should be perfect in all honesty. I only matted it as it was quite warped with the techniques I had done on it.

But back to the "beautiful" card with Jessica:


I have to be honest I wasn't really that sure I liked this page looking at the images and the prep before watching the class video.  I'm still a little bit undecided but I learnt quite a few different ideas and there is really a lot I like about this page. I wish I had more coloured sprays and kicking myself after completing the page I actually do have the purple and gold spray which I thought I bought but couldn't find. Jess used on her page four two-tone sprays Spring Green, Ocean Blue, Fuchsia and Royal Purple; all with gold as the 2nd tone. I did not like the Ocean Blue flowers at all on her card to me they jarred and didn't go with the other colours. So I used Spring Green and Fuchsia happily enough, then thought I would use my only other 2 sprays I own; apart from black, white and shimmer ones, which are Lavinia Golden Temple (in the picture above it's the flower between the 2 fuchsia flowers and is golden with almost a copper mica) and Izink Gold Mine dye spray (Aladine) - it's the very motley gold flower above the sentiment and then I hated it so much on the bigger flower I sprayed on some Ocean Blue, which I think made it worse. I'm not liking the Izink spray at all when applied directly to card stock. I used both these sprays at SENZ making my fab AALL and Create card and the sprays were great used through a stencil on an ink blended background (you can check out the yellow card HERE).

What I liked about this project was actually working on Charcoal card stock, we used Charcoal and black ink to darken 2 opposite corners. We then stamped the Positive Script Bold Print with firstly the black ink, then we made a puddle of a few drops of  White Glimmer Metallic ink and a drop of two of water and used this for stamping with the same stamp set (we stamped off once onto scrap paper before stamping on our card panel). Left over metallic white was splattered randomly around. Jessica's tips for splattering were (a) the harder the tap, the bigger the splat; (b) a bigger brush makes a bigger splat and  (c) your paintbrush needs to be moist with water already otherwise what you're trying to splat just gets absorbed into the brush. 

We then used our finger tips to rub some Glitter Paste around the edges, I probably didn't add enough but there's some between the 2 gold patches on the RHS and it looks fab IRL. We also finger dabbed what was quite a lot of Gold Hero wax for me around the edges plus also made a wee pool of it too by adding some to a few drops of water on our craft mat. I actually thought this was looking pretty damn amazing at this stage after my initial reluctance to do this project.


Then it's really just a matter of arranging your flowers from the Beautiful Day bundle we had coloured up with our sprays. Jessica's placement was different the 2nd time around so it's about placement with the background you have achieved. She also discussed about making triangles with our flower colours plus having odd numbers when planning where are flowers were placed. I also added some Gold Hero Pearls to my flower centres.


I think I would be happier with my efforts if the flowers with the Goldmine Izink spray wasn't on my project page, but overall I was really pleasantly surprised how fun this was and it has a lot of wow. Only 2 more projects to share I am very thankful Hero Arts has started up the Facebook group page and the weekly inspiration. I am hanging out till my discount code I get from SCT big box event I can use in the Hero Arts shop as my wish list is growing and no one down under seems to sell much Hero Arts  which is a shame as the kiwi dollar is not very strong at the moment and US shipping kills me and my craft budget when we sink too low:(

They also have planned a Stamp a Long for their Holiday catalogue which I am really tempted to do as I have loved, loved this event but I have my SCT big box event coming up real soon plus my Pinkfresh Studio and The Stamp Market combined Holiday event so my plate is full, as is my craft room shelves. So guess I'll just work on getting some more mixed media products for the moment when I can use my discount code. Hopefully it covers the shipping.

Thanks for popping in and I hope you do Have A Beautiful Day!

 Karen 

28 August 2023

Technique Tuesday #3

I actually had a really loved "mixed media" weekend as I ended up KReating 3 things and all 3 had different mediums other than ink on them!

Today is the day Hero Arts share on their Facebook page new inspiration for the week at Monday noon kiwi time (8pm EST Sunday), it's a great way to enjoy my lunch.

Our challenge after last week was to use a paper towel on our project either but using it to apply texture or even incorporating it into our project.

I wanted to choose a different colour combo than my 2 previous cards so decided let's go blue this week. I received as part of my Stamp-a-long bundle from Hero Arts an Ocean Blue + Gold  two-tone metallic spray. That name made me think of the sea so I started off stamping a vortex of fishes in Twilight ink onto Distress White Watercolour paper (smooth side). The vortex was too big for my card in all honesty so stamped to one side then I thought ohh I can add my glitter paste that I wanted to press my paper towel in too for the challenge through a stencil. I used a Fish Net stencil from Waffle Flowers. I have to admit once done I was thinking ohh maybe that wasn't nice putting a net around them but was hoping I'd find a sentiment that I could use to "free the fishes". I then set aside to dry.


When it was dry I grabbed my two-tone spray and was thinking wonder what I can use with it when I remembered this mystery "nail-polish bottle" of Turquoise Silk Liquid ink (iridescent) I received in My Monthly Hero kit in May 2017. The nail polish applicator always confused me but I just used it to paint the colour on at the top of my now dry stenciling and misted downwards over the fish net with my Mista bottle. I then sprayed in my splat box the left hand side with the two-tone spray and let dry.


It was very blue at this stage so decided I needed a Jenn Shurkus mermaid to brighten it up plus I have been really wanting to play with my new mermaid set from MFT stamps.

I then added one of the sentiments from the Vortex of Fishes stamp set which says "meet me by the sea for that's where i shall be" in silver pigment ink randomly alone the left hand side. One of the coolest technique Jessica Frost Ballas shared in the Mixed Media Stamp-a-Long was stamping into White Glimmer Metallic ink, stamping off once on scrap and I added some "bubbles" from a very, very old SU! set called Timeless Textures which I have never used but never retired as it's a bit like the Mixed Textures set I received in my box from Hero Arts so many versatile stamps in the set for adding texture.


I love how the "bubbles" look on the LHS.


I stamped and embossed a  sentiment in fine silver detail from another MFT set on Dragonfruit card stock. My wee mermaid is E00/02, RV02/04/06/09 and BG10/32/13 (lightest >> darkest).

Supply List:
Hero Arts: Glitter Hero Paste, Ocean Blue + Gold two-tone metallic spray, White glimmer metallic ink,
Turquoise Silk Liquid ink (iridescent) 
Stamps: Vortex of Fishes (PF), Mermaid for Each Other (MFT), Oceans of Fun (MFT), Timeless Textures (SU!)
Ink: Versafine Clair Twilight, Silver pigment (Encore)
Paper: Neenah Solar White #110, Distress White Watercolor (RNG), Dragonfruit (C9), Xpress IT blending
Other: Fish Net stencil (EF), Copic markers, Distress Collage Medium Matte (RNG), Distress Rock Candy (RNG), detail silver embossing powder
 
Well I had no real idea where that card came from but it all started off with Technique Tuesday and my Ocean Blue and Gold spray and I love it! Thanks for popping in.
✿ Karen ✿

26 August 2023

Sketch for a teen take TWO

Hi all, this is my second go at the sketch for a teen. This time with some random colour either side of the image. With my limited range of teen-friendly stamps the challenge at AAA cards has certainly challenged me. I blogged yesterday with take one which I was really happy with until I went to enter it via Mr Linky and then realised I hadn't got what the challenge actually was!

Today I've tried to make the card still uplifting with a positive message and have added some "splashes" of colour as real splashes using the ink smooshing technique around the mermaid's tail which I had embossed plus masked off at this stage. I used a few of my blue Distress inks for the smooshing.


I used some Nuvo shimmer powders (Lilac Waterfall and Atlantis Burst) and Lindy's Magicals (Time Travel Teal and Shabby Turbine Teal) to colour in the tail. It's very sparkly and shimmery IRL.


Supply List:
Stamps: Be a Mermaid (SSS) and matching dies
Ink: Versafine Clair Nocturne, Unicorn White pigment (HA)
Distress inks (RNG): Salvaged Patina, Tumbled Glass, Peacock Feathers, Salty Ocean
Paper: Distress White watercolor (RNG), Neenah Solar White #110, Teal Topaz (SP)
Other: Black and white embossing powder, Lindy's Magicals, Nuvo Shummer powders, Large Stitched stackable rectangle die (LF)
Challenge: AAA #147


That was fun and quick to whip up the hardest thing was ink smooshing in a smallish area, a few spots got on the wrong side but overall I'm happy with the effect.

✿ Karen ✿

25 August 2023

Sketch for a teen

This is the current challenge at AAA cards and surprisingly quite hard for me as I don't really make cards for teens anymore. Now we are grandparents in time I guess I will start buying some useful sets for older children but the grand kiddies are 1 and 3 so I'm safe for quite awhile.

So looking at what I own a neon rainbow done CAS was as good as I could get for the moment. I love the card and this set which will not retire from my stash.


Supply List:
Stamps: Rainbow of Happiness (SU!)
Ink (all SU!): Polished Pink, Lemon Lime Twist and Tahitian Tide
Paper: Neenah Solar White #110
Challenge: AAA #247


This was a great challenge as it really made me think about how I would make a card for a teen. Do check out the cool inspiration at AAA cards from the DT and the other participants. 

I may have to keep thinking about this challenge some more now I've gone to "enter it" I'm now thinking I need to incorporate in the 2 blocks plus maybe a silhouette. Anyhow I love my rainbow card it's much brighter than normal and my 3 year old granddaughter had fun making a pink and orange one; which are her favourite colours. You have to love a MISTI for stamping with her even if there is more ink on the door than on the stamp.
✿ Karen ✿

24 August 2023

Finally finished my 1st big box!!!

Getting excited my 3rd big box from Scrapbook and Card for their Fall 2023 Cardmaking event should be shipped out next week so thought it's time to take a BIG breath and do the last class from September 2022. Don't get me wrong this is a fab class but "I don't do fiddly" and when I say fiddly I mean fiddly as only Spellbinders can do it. Just look at the elf's leggings all those teeny tiny white strips have already been glued on by moi so I didn't lose them.


This was a value added class and Spellbinders were extremely generous to us and provided us with 4 die sets, 1 stamp (sentiments), 1 BIG stencil, lots of bits of coloured cardstock (I'm in love with their their white, Snowdrift, which is almost velvety) plus some gold mix gems. The stencil (Diamond Dots) and Dancin' Elf  dies were exclusive to our event. Below is what I transformed all those bits into.


The dancin' elf card I have spread embossing paste through the stencil and when removed sprinkled over a clear glitter, I so wish photos could show glitter but trust me it's there!


Now unbelievably those legs move really easily, if you look at all the die cut bits above his leggings have a hole which is popped over one of the small Spellbinders square foams (2mm) and they swing really easily from side to side. I know this will make Pete's mum squeal so I am bookmarking this card for her for Christmas of 2023!


The second card was the "easiest" and loving the Brush Gold card stock and that fab white Snowdrift card stock.


Last card was a real show stopper and also fab cardstock Brush Silver and Glitter Foam Silver - love, love them. I actually used in the middle of my poinsettia's some Hero Gold drops in the centre I had created on my silica pad as I thought they matched the Brush Gold. For this card the stenciled background is a gold paste the one I could find at the time has glitter in it but I love how opulent it is.


Well I would say I still don't like FIDDLY but OMG maybe some fiddly is worth it if you make fabulous cards like these. Huge thanks to Kim Kesti who took the class and made it look easy and to the person who packed our kits OMG so many bits of cardstock and an even bigger thanks. Spellbinders were so generous too, what a kit haul we received.

I am so relieved I can start the fall 2023 event at the end of September with a clear conscience as the first big box for me is now COMPLETED!!!!


✿ Karen ✿

20 August 2023

August Create and Connect : Craft Along

Pinkfresh Studios (PFS) like a lot of companies offer 2 fabulous box events a year and then a weekend of presentations/classes. These events are not cheap mainly because the cost of shipping is horrific for me in New Zealand; normally in the 100 USD bracket, which when you "double it" makes it even more horrific.

We  definitely get more product than what we pay for plus the lessons are fab and I really get to use the products I receive on multiple cards and find myself reaching for that stampset as I "know it". So in the end I feel I get good value for money.


I was delighted when PFS announced they were starting monthly craft along with Lea and Heather and the cost was only $10USD. For this amount we got  access to PDF instructions to create 2 cards with newly released products from PFS PLUS suggestions to alternatives in their range of products we could use. We also  had 30 minutes where we could just chat to the two of them in Zoom if we wanted too before we were all muted and they created a card each. PFS event classes are always relaxing and easy to keep up with as they allow one hour per card, this craft along was no different, they even had a small break between cards. The class video is only going to be available for 3 months, so don't sign up if you don't have time to do it sooner than later is my only suggestion to you.

August's Craft Along was using July's release which I'm not sure why haven't arrived in NZ or Australia yet and I didn't own their suggested alternatives but I thought a set I received from February's Create and Connect event would work; interestingly quite a few of us thought the same. 

I managed to create the first card yesterday (Lea's card) whilst watching and doing other stuff in my craft room.


The top panel has been debossed with a coverplate, I'm not sure if I used the right side of the panel but will try again when I get my hands on the Chevron coverplate they were working with (which was top of my wish list for the July release). My motley collection of tag dies actually worked really well, so cost will be a factor whether I buy their new tag set. I was amazed how many tag sets I already own.

Supply List (PFS):
Stamp: Farm Fresh plus stencil and coordinating die, this is not available to purchase. It was as part of an event kit from February, it maybe released next year; as it seems like my holiday event products from 2022, the majority are about to be the August release tomorrow. This make me happy as I should have the goodies for the next Craft Along in my stash!!!
Inks: for stenciling LHS >> RHS; Soft Lilac and Candy Violet; Mermaid Cove and Tidal Pond; Raspberry Bliss and more Raspberry Bliss; Sweet Mustard and Marigold; Sparkling Rose and Bubblegum
Coverplate die: Hexagon Tiles
Ombre Glitter drops: Pixie Dust

Other Supplies (not PFS): Bubble Bath card stock (SU!), ivory glitter paper (bought at local craft store), Tags a Lot (ME) - middle tag and circle eyelet, Tasteful Labels (SU!) - left and right die cut out, embossing plates (Sizzix), Gold Pearl embossing powder (WOW)

This was a fabulous class, so pretty and great value. I am always happy to make a Lea card, they are always so gorgeous. I'll be back with part 2 when I make the second card.

✿ Karen ✿

18 August 2023

Technique Tuesday #2

This week's technique that Libby from Hero Arts shared was stamping directly into paste with a red rubber stamp. You can re-watch that video HERE. We have been challenged by Hero Arts to do one thing in Mixed Media that scares us. I have to admit stamping a stamp into paste scares me a lot, so much so when I had a go I actually used an old background stamp I own called Lines Background (HA) which has been in my collection forever.

My next dilemma was I don't own any coloured pastes, Libby was  using a gold paste that looked magical. So I made my own by adding to a small amount of Hero Paste 1 drop of Ocean Blue and 1 drop of Daffodil Watercolor inks (both HA), it was too blue for me so I added 1 more drop of Daffodil and now it was too minty green but I could see my paste was getting watery looking so thought, oh well let's work with that.

I spread it over part of an A2 panel of Heavyweight cardstock (RNG) and then stamped my stamp in it, I think my layer of paste was too thick as it just showed mainly texture not the pattern but there was quite a bit of paste still on my stamp so I thought lets not waste it and stamped bottom RH corner and then top LH corner and I really liked the look of that impression. My image is upside down below so the first stamp off is showing in the image as top LH corner.


At this stage I was trying to think what to do with "the mess" but left it to dry overnight. I decided to persevere and not start again and sprayed my background 3-4x with Hero Arts Two Tone spray : Spring Green and Gold. When that dried I added some script text from Mixed Textures stamp set (HA) using Warm Buff ink (PFS). I have also added some gold Hero Wax to the raised bits using my ring finger. Most of it gets covered up but you can see it peeking out in places.

I decided to add a largish flower and thought I would use Flowers in Bloom (MFT) which has a coordinating die. Looking at the colour wheel the colour directly opposite to yellow-green is red violet. 


Off to my source of all things Copic I used Kit and Clowder's weekly blends to get some red violet combos. Alyce had 5 on her site and I settled on no. 3 which she calls Razzmataz RV69/19/04. I also used Lawn Fawn's Jellyfish ink to do a no-line colouring look.

I splattered some White gold Metallic ink, added some Cork Hero Pearls and a few Encouragement Sentiment Strips (HA) I have inked the edges using Concord and 9th Dragonfruit ink to finish off


It's hard to imagine that my card started off as a blob of minty green paste with TEXTURE but it truly is so pretty, vibrant and positive at the same time, even my partner called it a "work of art".

17 August 2023

Follow your Passion


It was definitely time to play with my Hero Arts Mixed Media Stamp a Long class and supplies. This fab page was taught by Nichol Spohr who is a creator that for a long time seemed to fly under the radar. I think she is fab so I was really excited to see she was one of the tutors for the recent Hero Arts class. I loved the pace of her class she could keep up with her in the 90 minutes including the drying time. All the products used are Hero Arts apart from a few which have the company abbreviation in brackets.

This page started off with us painting the background which is just Neenah #110 with Rose Gold Glimmer Metallic ink. It was part of our homework but it was great to do it with Nichol as she just added a few drops to her craft mat and then used a DRY flat brush to paint in both directions. I had my 3/4" brush from my Nuvo pack and it worked fine, it didn't really matter if there were a few brushstrokes, it became part of the final texture or hidden by the rest of the process.

The background then has the fab Positive Script stamped on with a brown ink. Then a thin layer of Hero Paste has been added through the Stacked Circle stencil and allowed to dry. When dry gold Hero Wax has been added with our ring finger. This was the tip of this class!!! Don't use your index finger to add the gold wax use a non-dominant finger. It made a huge difference to the lightness of your touch.

The flowers come from the Beautiful Day bundle. I don't own any Hero Art inks apart from a few grays (they have great grays). So I used my Nectar (C9) and Gathered Twigs (PFS) to ink blend my flowers and leaves and again stamped the tiny word script from Mixed Textures stamp set. Sentiments come from the Encouragement Sentiment Strips stampset and I have used my Tattered Rose distress ink (RNG). I've also splattered the background with White Metallic Glimmer ink and then a few drops of Cork Hero Pearls to middle of the flowers to finish off.

I wish my photo could reflect how fab and shiny and pretty this is in real life but it is a stunning page and yes the sentiment strip "Follow Your Passion" was a great affirmation in the middle of the page, along with the other sentiment strips too.


This was a fab class and so many cool techniques you could use on a card too. Time to go work on my next Technique Tuesday card for Hero Arts which is not going so fab. But hopefully will look pretty when finished.

✿ Karen ✿

13 August 2023

Take one for Craft Roulette 176

This week's parameters the split card was the stumping me parameter and I was going to make a gatefold card with some fruity DSP but I really wanted to have a play with my You're the Zest stamp set (LF). I made a fab background by blending some Distress Oxides: Dried Marigold, Spun Sugar and Kitsch Flamingo. Then pounced through the Falling Hearts stencil some Liquid Stardust; both products are from Lawn Fawn. It's so pretty and jolly in real life.

I then watercoloured using my Zig Real Colour brush markers; at this stage was thinking I could use the branch to split my panel but then remembered my Tiny Sentiments: Hello die (Altenew). I so wish I had stuck with the branch splitting the middle as the parameter is split middle not split card!! So back to the drawing board. 


I really like my card so off to think about how to "twig it" for the challenge.

Challenge parameters are below if you want to join in on the FUNN with Craft Roulette.


EDITED ONE DAY LATER: Take two; I'm not sure if I made my card "better" but I have split the letters by Copic colouring them, the blend looks OK when you look at the card but in a photo it looks messy but I'm happy I got my 10th submission completed and submitted with 10 minutes to spare.


EDITED 2 DAYS LATER: I tried adding Wink O' Stella but it didn't really smooth add the blend, then I saw in a bucket on my desk some long retired Shimmery Crystal Effects (SU!) I thought it would be too thick or blocked but it actually was a OK and I have a wee glossy layer with a bit of shimmer which maybe doesn't show that well in the photos but works really well with the Liquid Stardust heart background. So take 3 is a wrap!!


✿ Karen ✿

10 August 2023

Technique Tuesday with Hero Arts

Hero Arts have started up a Facebook group following on from the very successful Mixed Media Stamp-a-long and as promised they delivered with the first FREE technique class. Lydia one of our teachers from the event was first up and OMG I loved her card and the fact you didn't need a stencil she just worked with her palate knife and some corrugated cardboard from an old box. She also used  Hero Arts Neon Watercolors which looked so amazingly vibrant. 

I wanted to have a go at her technique straight away but Hero Arts made sure I definitely did it by starting a Technique Tuesday challenge. This week after Lydia's technique we were challenged to create a project with texture, so in all honesty I cased what she did using my supplies from the Stamp A Long I had ordered and I was thinking I needed the Neon but loved how my background came out with the supplies I had.


Hero Art Supplies:
Stamp: Beautiful Day bundle, Mixed Textures
Liquid Watercolors: Pink, Dandelion
Other: Fuchsia and Gold Two-Tone Metallic Spray, Gold Hero Wax, Rose Gold and White Glimmer Metallics, Hero Paste, Gold Hero Pearls, metal palate knife

Other Supplies:
Paper: Distress Watercolor (RNG), Melon Mambo (SU!), Neenah White #110
Ink: Warm Buff (PFS), Doe (PFS), Gathered Twigs (PFS), Catching Rays (CP), do-si-do (CP), Pucker Up (CP), Versamark, Versafine Acorn
Other: Alabaster white EP (BM),  A2 Layers dies (WF), low tack tape (CTMH), stamping foam squares (SP)

Lydia started off her card by adding a strip of post-it note tape (1" wide), I used my low tack tape from CTMH (3/4") - this is to protect where the stamped sentiment is glued in on some clean card stock.

With a palate knife add a layer of Hero Paste and add texture with the back of your palate knife , she also added texture with some corrugated cardboard.

It important to remove the low tack tape now so it doesn't get cemented to the card. Also another great tip she shared was to lightly mist the back of the card to help with the warping. At this stage leave to air dry and go wash up palate knife and seal pot of paste. I left mine drying when I went out for lunch and gave it a quick blast with my Ranger Heat Tool on my return. Adding the Watercolor Liquids you add drops and then mist to make it go in the direction you want.

Looking at my card I loved the orange colour that I created with the Dandelion and the Fuchsia spray.

I have white embossed the flower and leaves from the Beautiful Day bundle and ink blended colours to work with the background. I have also added some small script words from the Mixed Textures stamp (this is my 3rd page technique for the flowers for my Art Journal which I haven't KReated yet).

Splattered the glimmer metallics and a wee bit of Gathered Twigs ink and used my finger to add a bit of gold wax plus some gold pearls to finish off.

I then used my A2 layer dies to mat up plus it tidies up the edges. Well I loved this technique and the bright Mixed Media card. And look there's "hardly any brown" to be seen.

I hope you all have a beautiful day, its a bit gloomy and wet here in Hamilton today, so it might be snuggle up with a book beside the fire kind of day.

✿ Karen ✿