Showing posts with label Pinkfresh Studio. Show all posts

18 October 2024

Just Add Ink 724: Colour Challenge time

Hi everyone it's time for another fun challenge at Just Add Ink and we have a colour challenge to play along with.


The peach and the blue colour are complimentary colours on the colour wheel so I thought I would work with warm browns as my 3rd colour. I do not own any of these SU! inks or card stock so chose to work with Apricot and Storm adding in Warm Buff  for my 3rd colour, all from Pinkfresh Studio. I've also added their lighter shade of ink for my blending of the "abstract art background".

I'm also going to enter my card in Pinkfresh Studio's monthly challenge as this months challenge is all about ink blending and I have used stencils to make my "work of art" plus colour in my oranges.


Supply List (all PFS unless stated otherwise):
Stamps: Framed Art (plus matching stencil and dies)
Ink: Warm Buff, Peach Fuzz, Apricot, Slumber, Storm
Paper: Neenah Solar White, Hammermill, Light brown woodgrain (LF), Barely Peach (SP), Vellum Paper (SU!), 
Dies: Diagonal stitched plaid coverplate, Curly Leaves, Stitched sentiment strips (MFT) 
Other: Foam squares (SP), Gold Metallic pearls, blending brushes
Challenge: JAI#724, PFS October 2024

The Design Team from Just Add Ink do have some fab inspiration to get you inspired for this colour challenge, so do check them all out and hopefully you will be inspired to have a go, what will your 3rd colour be?? As always you can use neutral colours (white, "brown" and black) in your mix.

Happy stamping....

EDITED 2/11/24: My card was the "winner" of the $50 gift certificate from Pinkfresh Studio, I'm a great believer in entering in challenges which involve my favourite companies. It would be lovely to be in the "top 3" but being able to buy new goodies for FREE even better!

✿Karen✿

23 August 2024

Humbled & Grateful

It's time for some Inspiration from the Just Add Ink team for this week's challenge. 


I was a bit stumped as I didn't have any stairs or pot plant stamps to my recall in my stash, so I thought outside the box and decided the stairs which to me are the dominant feature were blue stripes and I would add a wee terracotta coloured sprig of flowers along the left hand edge. I love how my card turned out; so it was a fab inspirational photo and I can't wait to see how you interpret the photo.


All of the products I have used today are Pinkfresh Studio and I have blogged before using this set which I think is really versatile, you can see that earlier post HERE

I have used a Horizontal Stripe stencil which is for slimline cards but have blended on an A2 panel and you just get a slimmer panel and so my white space is the grey walls. I used 3 blue inks and fading them to the right, starting with the lightest at the top as the stairs would be brighter as they reach the light: Summer Shower, Seaside, Blue Jay

I stamped the image from the Humbled & Grateful set in Warm Buff aka "faux gold". This is an easy set with only 2 stencils the flowers and the leaves but using the 1/2" blending brushes from PFS you can still get some graduation easily and I added a deeper colour with the 1/4" brush. Flower stencils were Sunkissed and Mango Sorbet. Leaf stencil was Eucalyptus and Spruce Tips. The sentiment was stamped with Mimosa which is the ink between the two I have used on the flowers. 

Last but not least some Butterscotch glitter drops for a wee bit of bling. All the die cuts have been stacked with plain diecuts as so much detail it would be very tedious to add foam underneath. I hope I have inspired you to find some inspiration from the photo and join in with the fun at Just Add Ink.

I'm also going to play along with Just Us Girls as they have an Anything Goes Stencil week. I have to admit stencils are a really big part of my card making these days, so a fun challenge to join in with. 

Thanks for stopping by, have a fab weekend and hopefully a KRafty one ;)

✿Karen✿

17 July 2024

Multi Colour Letterpress with Lea Lawson

Pinkfresh Studio recently held a virtual hot foil and letter press event. We received in our kit box 5  different sets plus a Blanket Stitched Bracket die, ephemera sentiment pack and gold pearls. This Virtual event was a lower price point than their normal bigger events and it was supposed to be a "smaller event" all over in one day. Even so we still got four 90-minute classes online plus we were also provided with instructions for 2 extra make 'n takes.

I actually only bought a second-hand Spellbinders Better Press system as Pinkfresh were going this route. I still don't get what the fuss is all about with this system, it doesn't make me happy, I guess it's not really for me. Also no offence to Lea as this was the only class I could attend live, if I'm honest I don't like this set it's really old fashioned IMO.

But we'll look at the positives first; you can use the big ink pads to do multi-colours on the press plate but it would be so much easier and probably more effective with small ink cubes. As always use a small blending brush to soften/blend where the colours meet. It was also my first time using press plates that had a stencil which you attached to the magnetic platform as many parts to the set. The other thing PFS have discovered is that the press plates hot foil beautifully (probably nicer than original-style plates) so I see it as a win that if you choose to buy the added extra plate for foiling you can also use it for letter press.

Below is the Splendid Florals press plates, wee matching cutting die, stencils if you wanted to colour up a foiled image, plus the stencil which you attach with removable tape to magnetic platform and then the plates go on top. I was happy doing it this way, for some the sandwich was too tight having the extra so you could remove one shim from under the magnetic platform or use the stencil printed on photocopy paper, they provided us with the PDF file so we could print if we needed too.


These are the 2 cards we made with Lea in class, the one on the left is the letter press and the one on the right has been foiled and coloured in with ink and a stencil. All the sentiments came from an ephemera pack which was provided.

I have managed to get some graduation of colours but it is hard with the bigger inkpads and if this was your jam I would buy a set of small ink cubes for the technique. It's pretty enough  but I just don't like this image.

Trying to show the impression, I made the mistake of using an A2 die to cut out my panel and it flattened the "press" into the paper. To do this technique you have to use a thick cotton paper or watercolour paper and it's rather expensive. I now own a huge pack as we needed 5x7" panels to do the class so have plenty to play with. I wasn't the only person that commented on this happening and it seems like one solution is to repress the dry plates again.

I prefer the card below I like the colour combo better for starter and its quite a sweet shaker card, we also received in our stash a border die  with the blanket stitching which is quite nice. I have just ink blended Cherry Blossom ink to colour the panel. I was a bit heavier than Lea's card but I like it as is.


You can see the foiling here best IMO but it is very pretty in real life.

Our sneak peek for class showing Lea's card which probably shows the foiling of best.

I have 3 more classes to go for this Virtual event but if I'm honest I really only like one press plate we received, I think the other 3 sets are old-fashioned. This is the first time I have done a virtual class where I have disliked so much of what I received. We got a ton of stuff so great value for money so I will just write of the sets I dislike as part of learning to use these 2 systems better.

Thanks for popping in.
✿Karen✿

3 June 2024

Be Fearless

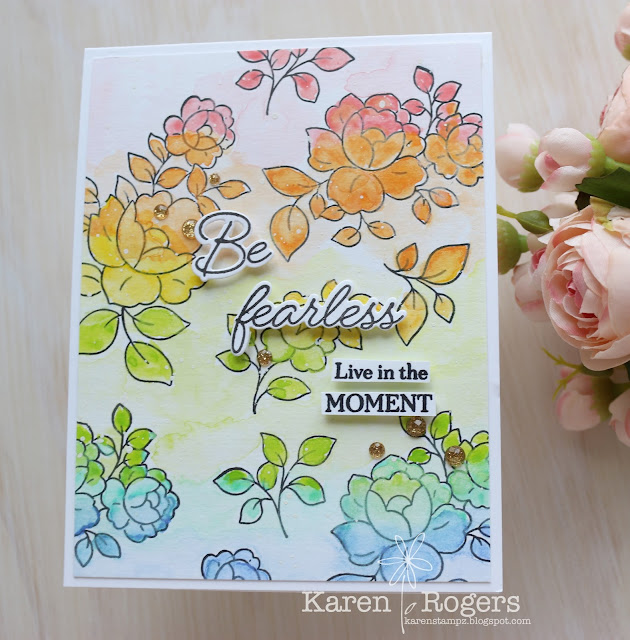
This is the name of a new Pinkfresh Studio stamp set which was only officially released June 1st, 2024. Imagine my delight to have received the stamp set in my Creative Art Retreat box from  Jenn Shurkus pre-release, I'll have to wait a few months for the dies, stencils and press plate to arrive down under to buy them but as you can see below you just need the stamp though Jenn and her team have stamped and die cut out the Be Fearless for us and it wouldn't look as pretty if I had to do it by hand.

Jenn's Creative Journey Art box truly is a retreat the majority of our panels are cut, images are stamped and die cut so we just have to make pretty backgrounds and colour things which equals my happy place! The retreat is over 2 days with 2 sessions each day, both being 3 hours long. Normally the first day you spend time making backgrounds and colouring things, day 2 you make cards. This year we actually had to do some home work and stencil 4 panels with the Luna Paste we received using 3 different stencils we also received so they would be dry in time to colour up in class.

Well I'm working at my own pace and I have finished session one day 1 and unlike other events we haven't Copic coloured anything yet, we've being doing backgrounds and colouring with Distress Watercolor Pencils, also unlike other retreats of Jenn's we actually have a finished card after session one. You would have had to have done other events with Jenn to know that this is incredulous!

Anyhow onto the card where we have stamped the images from the stamp set randomly over a piece of Distress Watercolor paper with a waterproof ink.


We have then loosely coloured in the images with the distress pencils and then when dried coloured in with an even lighter wash.

Colours used for flowers: Saltwater Taffy, Dried Marigold, Spiced Marmalade, Sweet Mustard, Twisted Citron, Salvaged Patina, Shaded Lilac.

Same colours used for wash except no Spiced Marmalade and Squeezed Lemonade used instead of Sweet Mustard.

When dried we have trimmed an 1/8" each of all sides from the A2 panel or could be 1/4" inch of top or bottom and a 1/4" off one side but finishing off with a 4" x 5-1/4" panel to add to our card base. Sentiments been popped up with tiny bits of foam and a few gold glitter drops from Pinkfresh Studio to complete the card.

I'm actually feeling a bit overwhelmed with getting behind on Virtual classes in a box but this event is definitely my top pick for events to do if you are lucky enough to get in!


✿Karen✿

26 May 2024

AAA Card Challenge 266: Sketch Challenge

I am so looking forward to seeing what everyone comes up with for this sketch challenge. I have struggled for months with it. The joy of being on the Design Team, I get to see a year's worth of challenges and can work away at my own pace. This one has had me stumped as all I can see is "Mickey Mouse". I was going to use some circle dies and make a Mickey but didn't really have anything to use with the 3 black circles etc. and I've never been very good with punch art on a card.

Imagine my relief when I got a new stencil set which has triangles on it and then it was like yah I can make Christmas trees with it. I have to say this was quick, easy and only required moving the post-it note around to cover up triangles I didn't want to blend by accident. So this would be great to recreate for bulk card making for Christmas.


Supply List:
Stamps: Itty Bitty Holiday (MFT)
Ink: Mint (PFS), Meadow (PFS), Ocean Breeze (PFS), Versafine Clair Nocturne
Paper: Hammermill White
Other: Leaf and Sky Blue clear drops (PFS), Overlapping Triangles stencil (PFS), 1/2" blending brushes (PFS)
Challenges: AAA #266, JUG#728


I look forward to seeing what the Design Team and the entrants create with this sketch so hope you can play along too. I'm also going to play along with Just Us Girls as they are wanting stencils this week and my card is 3 stenciled triangles.


✿Karen✿

24 May 2024

Anyone need a hug??

I'm delighted to be the Guest Designer for CAS on Friday latest challenge and the theme is
HUGS

Normally I'd choose a cute critter hugging but I thought I would try something different and still hopefully be Clean and Simple. I've stamped a 4" x 5-1/4" panel with the fab flower from Miss Your Smile (PFS). This is actually the first Pinkfresh Studio stamp and stencil set that I bought and it's quite large. It has lots of hugs related sentiments and rather than colouring it up I thought I would just die cut the word hugs with a word die and colour the letters up. 

I've coloured up the die cut letters in multiple colours so I can also play along with Pinkfresh Studios May challenge too; this month it's Flower Power plus/minus a colour combo. I have flowers and I have used the 5 inks for the combo even if I had to stamp a wee sentiment in one of the colours to include it in the mix. I have glued 3 die cuts behind each letter for a bit of dimension as well. The sentiment I have just cut out by hand as there was no dies for this set,


Supply List:
Stamps: Miss Your Smile (PFS)
Ink: Versafine Clair Nocturne
PFS Inks: Bubblegum, Sunkissed, Citron, Ocean Breeze, Atlantis 
Paper: Neenah Solar White
Other: Big Hugs die (MFT), blending brushes (TE), sticky stencil mat (WF)

Thanks for popping in and hope you can join in with the CAS on Friday challenge and maybe try a different way of sharing "hugs".

✿Karen✿

22 April 2024

Berries and Blossoms with Heather

Gosh it's been nearly 2 months since my Virtual Cardmaking with Pinkfresh Studios happened and I haven't shared all the cards I made at the event. It was quite interesting how quickly they released a lot of the products we received in our kits in their March release, and this stamp set was one of the items released.

Before the event I thought the cards we were creating looked OK but I really loved working with this set. It's actually a "large" red rubber stamp which you stamp/heat emboss and then use the corresponding stencils to colour up followed by the coordinating die cuts out all the different elements in one pass. Card one is gold embossed, card 2 has been stamped in a light grey ink (Rocky Slope).

The class was officially titled "Elegant Notecards" and they truly are elegant and taught by Heather Hoffman.


We've used the notched corner frame dies to make a frame with PFS's Rose Gold glitter cardstock for card 1 and to make an impression for card 2. Card one also has the coverplate die (Stitched Octagons) we received as an essential for the event as an added feature on the background with a few wee splatters of ink. Card 2 we just used a bit of left over ink on our brushes.

At the time this was the first card we got to make on "our Monday" and it was a great start to the day's crafting. 
✿Karen✿
28 March 2024

Let's Get "Striped" with Time Out Challenges

I am absolutely thrilled and delighted to be the Guest Designer for Time Out Challenges latest challenge. It's a real fun one too; to use stripes on your project. You have 2 weeks to have a go and you too could be a future Guest Designer for a challenge (if you want too) AND Lawn fawn are generously sponsoring this challenge so you could also win a $25 Gift Card to the Lawn Fawn store, how cool is that!
I'm using a card idea that Jenn Shurkus, taught me/us at a 2023 Virtual Art Retreat. I've modified her idea and am using a stencil and distress inks to make my stripes. Jenn loves making fab backgrounds. In her original class we made very loose streaks of colour using Distress Watercolor Pencils as our background then placed our dark grey Copic coloured image on top. 

I've used a stencil to re-create her look and working with my smaller blending brushes to blend in the stripes. As I am actually using a slimline stencil I die cut out a perfect stitched rectangle with Lawn Fawn's largest Inside Out Stitched rectangle die. But oops I'd been a bit messy and there was gold embossing powder on my plates and I had gold speckles on the RHS after running through my Big Shot. As this was my second go at doing the panel, I went into how to fix-it mode. So spritzed with shimmer spray and water and blotted but felt it needed some black splatters. I used my Licorice spray bottle to add a few drops by unscrewing and just tapping lightly the tubing for the nozzle to make controlled wee drops/splatters. When I sprayed it was much too dark on my practice run. 

My first panel I added a glitter paste through the stencil after ink blending and it looked fab but had a few funny reactions around some of the stripe edges which is why I tried again to make my striped panel.


Supply List:
Stamps and dies: Humbled and Grateful (PFS)
Distress Inks (RNG): Worn Lipstick, Kitsch Flamingo, Dried Marigold, Squeezed Lemonade, Twisted Citron, Salvaged Patina, Shaded Lilac, Wilted Violet
Paper: Hammermill white, Neenah #110, Black
Other: Versafine Clair Nocturne ink, clear embossing powder, Frost shimmer spray (imagine), Licorice Izink dye spray, distress mista bottle, small blending brushes (TE) and foam strips, Inside Out Stitched rectangle die (LF), Horizontal stripes slimline stencil (PFS), Warm Gray Copics (W2,4,6,8)
Well this is a fun, fun challenge and there's no doubting that adding stripes is really effective so hope you can join in as well but definitely check out the Time Out Challenge blog to see the the inspiration on show.

I'll also enter my card at Simon Says Stamp Wednesday challenge which is an anything goes challenge. I also see Just Us Girls would like us to use  a stencil so I'll also enter their current challenge.

Thanks for popping in.
✿Karen✿

20 March 2024

Guest star stamper time..

I'm very excited to be the guest star stamper at The Color Throwdown for this week's challenge and even more excited when I saw I had the fun colours of pink, green and pink to work with.


I have to be honest I went with what was on my desk for this challenge, I often spend so long thinking about my card I never make one or as has happened recently someone used what I was going to use so I have to start again.

I still had some gold embossed Fluttering Butterflies from my recent Create and Connect with Pinkfresh Studio (PFS) sitting there waiting to be coloured up as I still haven't done my make and takes or finished off the last 2 classes. I also had a birthday sentiment with Bubblegum (bright pink) left over from a card I made for another pink, yellow and green challenge the other day too.


This is such a pretty stamp set we received at the event and the great news for you it's in their next release coming next week, so you can get your hands on it too as it truly is FAB! It also has a coordinating washi which is really stunning but the cool thing about having the stamp and stencil I can make it any colour I want.

Supply List:
Stamps: Fluttering Butterflies (PFS), Easy Expressions : Birthday (The Ton)
Pink inks (all PFS): Ballet Slipper, Sparkling Rose, Bubblegum
Yellow inks (all PFS): Lemon Whip, Sunshine, Sweet Mustard
Green inks (all PFS):  Fresh Pear, Grassy Knoll, Key Lime
Other inks: Warm Buff (PFS), Versafine Clair Nocturne
Paper: Neenah white, Lemon Lolly (SU!)
Other: Floral Grid coverplate (PFS), Gilded EP (BM), Notched Corner Frame dies (PFS), Twilight Ombre glitter drops (PFS), 1/2" and 1/4" blending brushes (PFS)
Challenges: CTD#785

It's lovely working with these Spring-like colours as Autumn is arriving early by the look of it in New Zealand. Thanks for popping in and I hope you can join in too with these pretty colours. I'm looking forward to what the DT comes up too so do check it all out.
✿Karen✿
1 March 2024

Geometric Fun with AAA Birthday Challenges

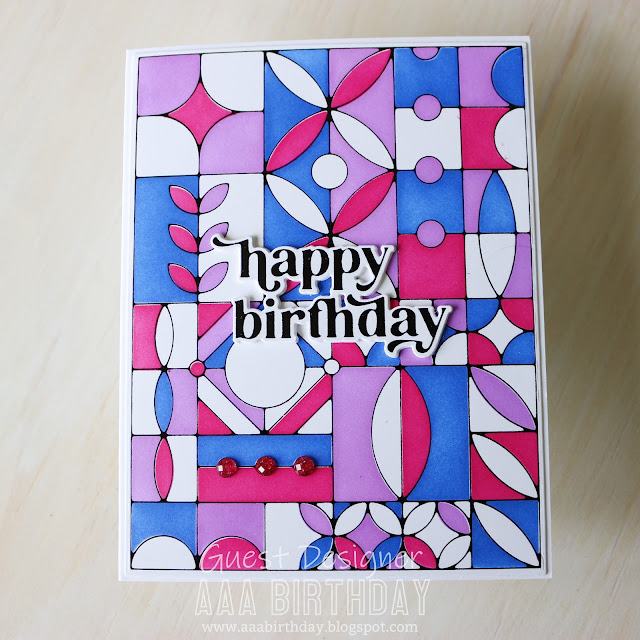
Hi everyone I'm absolutely delighted to be the Guest Designer at AAA Birthday for their March Challenge, as soon as I saw the graphic it reminded me of a hot foil plate I had sitting in my stash.


I hot foiled the plate with black foil and then thought maybe I should have just stuck to gold so did another one this time with matte gold. My first go was with the matte gold and Slumber, Sapphire, Lavender and Raspberry Bliss inks using my 1/2" blending brushes. It was pretty but it wasn't as dramatic as I wanted, partly because I'd graduated my blending and the colours faded back more than I thought they would when they dried. I also used 4 of the 5 stencils in the set as I wanted some areas to remain uninked and white.


So it was back to PLAN A and the black foiled image and this time I just went for the 3 darkest inks and also used my bigger blending brushes so easier and quicker to do a heavy ink blend for each stencil layer. I've only used 3 of the 5 stencils so I also have more uninked areas and more white spaces.

I wish I could show how vibrant the black foil is in real life but it is crisp and shiny, a bit like it has been black heat embossed. I've also laid 2 plain die cuts under the sentiment to make it have a bit more dimension.


Supply List (all Pinkfresh Studio unless stated otherwise):
Hot foil plates: Modern Design Blocks (and stencils), Perfect Sentiments (and cutting die)
Ink: Sapphire, Lavender, Raspberry Bliss (plus Slumber for gold foiled card)
Paper: Hammermill White (foiling), Neenah Solar White #110 (base card)
Other: Glimmer Hot Foil machine (SP), Black glimmer foil (SP), Matte Gold glimmer foil (SP), Magenta glimmer drops, blending brushes (TE) and 1/2" blending brushes
Challenge: AAA Birthday #59


Well I hope you have time to play along, you have a whole month to get creative, I for one am really interested to see what the Design Team came up for this Challenge as it certainly is different than the norm.

Thanks for popping in.

✿Karen✿

29 February 2024

Citrus Twist with Lea

Sharing today my second class from my Pinkfresh Studio Create and Connect and today's card showcases the lovely Citrus Twist stamp set, dies and stencils. Our teacher for this class was Lea Lawson who is the marketing director for PFS and she often shares creating cards with their products via YouTube and monthly classes in Zoom. 
These were quite simple cards to put together as the stamp set is one piece but we did a bit of surgery to create extra citrus fruit. The wee flowers and leaves die-cut out separately but were part of the stamp. Both cards used our essentials from our swag, the Stitched Octagons coverplate die, Notched Corner Frame dies, gems with gold dust and for card one a sentiment from the Extra Special Sentiments stamp set.

Pink grapefruit and lemons card:

The images were gold embossed before stenciling and die-cutting out. It's a really fresh colour combo. This was actually the first card I made at the event as Class One was live whilst I was sleeping and I think I maybe a bit heavy handed with my ink blending but it's still really pretty and lots of little details.

Oranges and lemons card:


I really like how we've used our Versamark (embossing) pads to add some random ink to the frame before pouring on the gold embossing powder. The embossing powder Lea used looked amazing like a burnt gold (she said it was an Iridescent gold powder, I thought she said from WOW but they don't make one but Hero Arts does and I own that so might try it out) - see her cards lower. We used up excess ink on our blending brushes to make a delicate background on the coverplate die panel, you also see the gold dust in the gems they provided as part of our swag, they're really pretty. The sentiment on this card came from the Citrus Twist stamp set.

Lea's cards sneaks (and again I think she's done a fab job teaching us our cards):


✿Karen✿

28 February 2024

Not just cards

The sun is shining again so just a very quick blog post today, I thought I'd share the joy and camaraderie of crafting with friends. I was very fortunate to be able to share my weekend away at a friend's crafty space, as it turns out she also got some candid moments on her camera. So a big, big thank you to Denise and Jackie for making it such a fun weekend.

Start of the first day Jackie and me are concentrating hard at this stage.

Time for lunch (and a wee glass of bubbly).


Ready for Mindy's Class:

Chicken pie for dinner anyone (and salad and bread and wine). I made Annabel Langbein's easy smoked chicken and mustard pie which I have modified to make super easy. 
  • In an essence mix in a bowl one diced (sliced or shredded smoked chicken breast ~300g), add a tub of sour cream (250g), 2 Tbsp wholegrain mustard, good handful of chopped parsley, zest and juice of a small lemon, salt and pepper. 
  • In a flan/pie dish line with baking paper and add one sheet of thawed ready rolled flaky puff pastry ~11" x 11" - I use Heritage Bakers brand now Edmonds no longer available
  • Add mix in middle, leaving gaps at side to wrap the "pie" up
  • Add another square of pastry on top so the points this time point to middle of first square. With a pastry brush wipe all edges with milk and fold and squeeze them together. Make a few slits on top and bake at 200oC for approx. 25 minutes

End of a long day, 15 hours later and looks like I may have lost my marbles or I maybe laughing at myself for losing more embossing powder on the floor again.

Next day hard at it again for Heather's Class:

And what I returned home with - 4 of the 6 classes completed and some beautiful cards and great memories. So still 2 more classes to do and all the make n' takes plus playtime.

Pinkfresh Studio have already announced their next class dates for 2024. Click HERE to see more details. They also run Scrapbooking events too.

Thanks for popping in.
✿Karen✿