30 October 2022

Treat Box for Halloween

I am not sure if I should thank her or not (but I think the answer is definitely yes) a stamping friend Alicia Yap was showing me her cute wee treat boxes she has been making. They truly are stinking cute but OMG they hold ONE LOLLY and the die set costs $82, now I am not sure where SU! thinks we all make that kind of money to wrap one lolly up in. 

The treat box I am discussing is called "design a treat box" and you can see it HERE on the official SU! website. Also if I was a child I would actually be really upset getting a teeny tiny wee box, no matter how cute with only one lolly.

Now I knew I had seen something similar to the treat box by Lawn Fawn so I was off Googling the next day whilst I was babysitting grandson and he was sleeping and yes Lawn Fawn do have something similar to SU! but approximately half the price I didn't really get investigating it's dimensions as I also found this wrap around box die from Sunny Studio Stamps that Krafters Cart was selling for $49 and it is a real box. Finished Box Size- 2-1/2″ square x 3-1/4″h. If you click on Krafters Cart it will take you to the shop.

My original plan for this Halloween was to use some orange wee bags I have here and stick on BOO in black glitter paper and put in some lollies for the neighbours children but I stepped it up and had to make the box once I bought the die but I often buy wee boxes to decorate so I am very, very happy with my find and I'll be using this wrap around gift box die again. 

So big thanks to Alicia aka Paper Munchkin for making me Google and a big shout out to Maaike who was making wee treats the other night on her You Tube channel so that helped me heaps in decorating my BIG box.


Boo to you all!

✿ Karen ✿

26 October 2022

I'm the Featured stamper at this week's Color Throwdown's challenge

And have they got a great inspirational photo this week, with the challenge to use purple, blush and sage.


I felt like I'd seen "that purple" before I was guessing Fresh Fig from SU! but now retired. 

My friend Sarah who has an awful lot of old (make that really old SU!) couldn't help me. So I have used my distress inks as I felt bundled sage was a nice sage green.

I used Concord & 9th Hello Lovely stamp set as it has 2nd stage stamping that wants you to be outside the lines. My first attempt I used Seedless Preserves, Tattered Rose and Bundled Sage. I swiped some Tattered Rose on a scrap of card stock to die cut out the "hello" to co-ordinate. The jewels are Peach Fuzz from Pinkfresh Studio.


I felt the Seedless Preserves was too strong as the Tattered Rose and Bundled Sage were not as vibrant colours so the card below is my 2nd attempt and is the card I would have entered the challenge with. This time I also added a bit of Dusty Concord on one flower and Milled Lavender in the background splotches. This time just black cardstock is popped into the hello.


And together:


Which one is your favourite?? I actually like them both, it's a pretty colour combo so hope you can join in with the crew at the Color Throwdown and have a go too!

Thanks for popping in.
✿ Karen ✿

25 October 2022

A challenging sketch

I have to admit that the sketch challenge at Just Add Ink this week wasn't giving me any light bulb moments. But if you go with the flow and do it - it really does work.


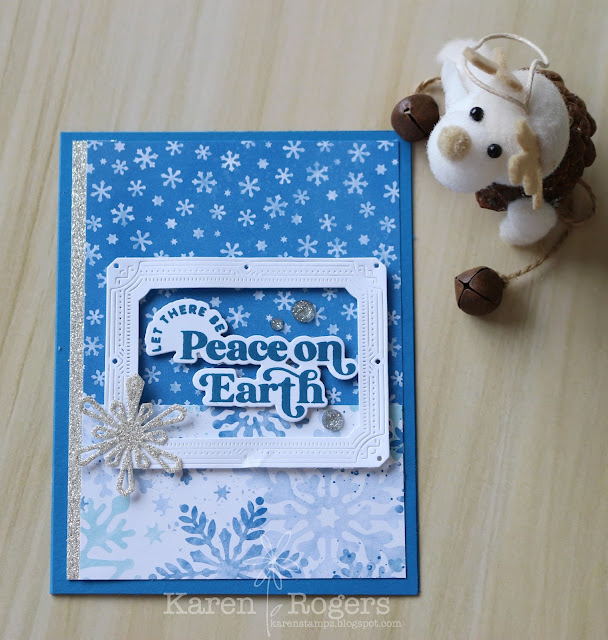
The first thing was to decide what DSP I wanted to work with. I have to admit I regret buying the gnome bundle from the latest SU! catalogue the gnomes are ugly and the DSP has fab colours but it's really busy and it makes me shudder. But I do love the gnome dies so I was going to make a die cut out gnome for the circle but when I looked at some of the backs of the DSP there are some nice papers with trees and snowflakes so I ended up using those papers and some product that is sitting on my bench as I attempt to finish off my Virtual Holiday cardmaking event with Pinkfresh studios. I love how my card turned out.


Supply List:
Stamps: Christmas sentiments (PFS)
Ink: Pacific Point (SU!)
Paper: Storybook Gnomes DSP (SU!), Pacific Point (SU!), Silver glitter (SU!), white 
Dies: Large Snowflake (PFS), Art Deco frames (PFS)
Other: Silver Sparkle embellishment mix (Trinity Stamps)
Challenges: JAI #626

Looking at my photos I can see I have beaten up my art deco frame a bit trying to get out one wee diamond that didn't cut properly. The dies I received from Pinkfresh Studios for our virtual cardmaking event had a lot of detail and I learnt how to use my metal shim real quick in my Big Shot. My poor old machine must be over 12 years old but it is still working sometimes you just need to work out how!

Well I think this was a fab card sketch so hope you can join in too.
✿ Karen ✿

24 October 2022

More falling for you

Looking at the challenges at Allsorts Colours of Autumn and Time Out's thankful it was time to revisit my Taylored Expressions stencil set I received recently.

****Colours oAutumn****
I would like to see entries inspired by the beautiful colours Nature gives to us at this time of year, RedsYellowsGreensGoldsOranges, Browns.


When I did the class with Taylor in my Crop and Create Cardmaking delivered event I used my SU! inks closest to the autumnal shades she used so I made sure to use different shades this time and also add in a green. I have also done a light splatter with the gold Gansi Tambi watercolour paint again. You can see my class cards HERE if you are interested. This is a lovely stencil with so many possibilities for colour combinations.


Supply List:
Stamps:  Happy Harvest (TE)
Stencil: Falling for you triple slimline stencil (FOUR layers) and clear stamp combo (TE)
Ink (all SU!): Cherry Cobbler, Grapefruit Grove, So Saffron, Pear Pizzazz, Cinnamon Cider
Paper: Cherry Cobbler, Neenah White
Other: Gold Gansi watercolours, paint brush, blender brushes (TE)

Now Time Out is offering a Lawn Fawn $25 store credit voucher this week and it is All Sorts 700th challenge next week so they also have a wee prize to celebrate that milestone this coming weekend. So hope you can join in too, you never know you may win something as well.


 ✿ Karen ✿

23 October 2022

Loving this sketch

AAA CAS challenge site have a really interesting sketch this week which I have to be honest I was a bit stumped at first with but then remembered the masking tape technique which Rhonda Fawcett taught me and I blogged about  HERE.


Now I didn't want my strip to be as wide as masking tape so I put a piece of my Satin masking tape from Altenew on a scrap of card stock and then chopped down the middle with my guillotine, it was the perfect width now IMO so I peeled off the card stock and held down the tape on Mango Melody (SU!)  and then holding the inked tape I touched the card mat. Repeated the step with Garden Green (SU!) ink. I then finished off with a die cut the  Hello tiny sentiments die from Altenew in Mango Melody card stock.


Colours were chosen to play along with the Color Throwdown's colour challenge for this week too.


I used Waffle Flower's additional A2 layer dies for my mat. I think this set of dies and the original A2 dies are my best investment to my crafting stash this year.

Well I am not feeling very chipper today I was struck down by some lurgy bug last night out of the blue (I'll blame the grandkids) so this is the main reason I have combined the 2 challenges but I have to be honest having the colours and sketch made making a card very easy even if your brain is foggy. I challenge you to join in too if you can. Until next time.

✿ Karen ✿

Happy Mail

I shared recently my friend's Suzanne mantlepiece with "my cards" on it so thought I must share some happy mail I have received too.

The first card is from a family friend Vicki Campbell who has joined me at card classes and this is her first stamp set she has bought Hues of Happiness from SU!


Then my friend Sarah Roche spoils me and she gives me lots of inspiration with her fab cards.


Last but not least some wee notecards from Kristine McNickle.


Haven't I been spoilt, Sarah and Kristine are both Stampin' Up! demos based in Hamilton and would love to hear from you if you are interested in classes, workshops or just buying some SU! goodies. I have linked their names to them.

✿ Karen ✿

20 October 2022

Believe in the Magic of Christmas

Now I love this sentiment and I love the colour combo Heather Hoffman created for our "make and take card" with the Winter Foliage background stamp set and stencils. The true blues with the emerald green and a pop of violet berries is really cool.

I thought I would list the six sentiments which make up the one piece stamp Christmas Sentiments which has a coordinating die. I have used a few on my cards to date (in Berrylicious ink or gold embossed).
  • Merry & bright
  • Joy to the world
  • Let there be peace on Earth
  • Hearts full of joy & wonder
  • Believe in the magic of Christmas
  • It's the most wonderful time of the year
Now I can see me using any of those sentiments on any Christmas card.

Today's card was an additional tutorial; we're provided instructions and a speed video ~5mins of the construction. I must admit by the time you do the make and take you are semi-expert at using so the speed video is all you need.

I am very happy to report that today when I stamped after my stenciling it was "perfect". So I learnt from my mistake yesterday and I ensured both times I stamped the card stock was firmly in the bottom corner of my MISTI. We stamped in a lighter blue ink first (Slumber) first, blended through the 3 stencils and then restamped over the top with a darker blue ink (Sapphire). I used my own tiny blender brushes for adding the detail in the middle of the leaves etc and did not like it as much as using the tiny blender brushes that Pinkfresh Studios gave us as swag. It was much harder with my old mini brush to just get a tad more colour.


Supplies used:
  • Winter Foliage (stamp and stencils), Christmas Sentiments (stamp and dies)
  • Large Snowflakes and Art Deco frame die set
  • Gold metallic pearls
  • Inks (all PFS): Slumber, Sapphire, Emerald City, Candy Violet 
  • WOW Metallic Gold super fine EP, caramel glitter paper (American Crafts), Versamark ink, MISTI, stamping foam (Scotch), blending brushes 
#pfcreateandconnect
✿ Karen ✿

Sharing the love

I awoke this morning to a text message and a wee photo from one of my oldest friends from when I first started working in the lab, way back in 1976. 

She just wanted to say thanks seeing my cards I have sent her on her mantlepiece still brightens her days (it maybe a hint for another too).


Her sharing this has brightened my day. I am blessed to have more free time to KRaft and KReate these days and seem to have a surplus of cards so have been sending quite a few out regularly plus given a few bundles to my sisters to use. I know how much joy the recipient gets from receiving one in the post and I too love receiving handmade cards.

On our mantle piece at home we have some cards my partner received for his birthday, one side is store bought, the other side is homemade cards he received or I have received. There is no comparison IMO. The store bought may have funnier jokes but the look pretty blah!!!

So I challenge us all to send out some more cards and not leave them in a box where no one sees them to brighten someone's day.

✿ Karen ✿

19 October 2022

Truly Joyous and Wondrous

I had a bit of free time today to finish off my lesson with Lea Lawson from Pinkfresh Studio. Lea's class used the Winter Foliage stencil, you can see the first card from the class HERE.

For this "lesson" we were supposed to stamp our background rubber stamp with our "MISTIs" in a light grey ink, use our 3 stencils and then put back into our stamping platform and re-stamp and they are right it brightens the inked image up. I am very thankful it is such a light grey as my re-stamp is not perfect and there is a bit of ghosting but it actually adds a cool effect and as you will see it makes a beautiful card.

Below is a cool tip someone shared in group, using a permanent marker. I used a Sharpie; they used a black Copic. I tried both and liked the Sharpie best. Then wipe with a (dirty) cloth and some rubbing alcohol  and it marks the stencil number and alignment guides enough so you don't have to squint so much.


You can also see 2 of my 6 mini blender brushes we received in our swag for the event. These will be released in the future and they were very nice for adding fine detail.


Supplies used:
  • Winter Foliage (stamp and stencils), Christmas Sentiments (stamp and dies)
  • Large Snowflakes and Art Deco frame die set
  • Gold metallic pearls
  • Inks (all PFS): Aquamarine, Mint, Coral Reef, Misty Coast
  • WOW Metallic Gold super fine EP, white glitter paper, Versamark ink, MISTI, stamping foam (Scotch), blending brushes 
#pfcreateandconnect

17 October 2022

Try saying navy, mustard and brown without wrinkling your nose up

This is the challenge at this week's Color Throwdown to use those 3 colours and I truly was thinking yuck but as with all colour challenges that you don't like they unexpectedly surprise you in a good way and this is one of those times.


I decided I would grab out my Gorgeous Leaves set from Stampin' Up! and turn the orientation on this card I blogged HERE towards the other direction.


Supply List (all SU! apart from the sentiment):
Stamps: Gorgeous Leaves, Magnolia Ballerina (sentiment - ALT)
Ink: Cinnamon Cider, Starry Sky, Versamark
Paper: Crumb Cake, Crushed Curry, Starry Sky, metallic copper
Dies: Intricate Leaves
Other: Copper cord. copper embossing powder, clear EP
Challenge: CTD #714

Well if you're like me and wrinkle your nose up at the colours for the challenge definitely go check out the challenge link to see some really cool cards and some clever ways to use these colours as a combo.

Thanks for popping in.

EDITED: My card was chosen by random picker to be the guest stamper, the pressure but it truly was a fab image I got to work with you can see the blogpost HERE
✿ Karen ✿

Just Saying Hello

I was looking at my card stash the other day saying I needed more HELLO cards as I haven't sent out any cards to my old neighbours for quite awhile. The challenge at The Card Concept and at Allsorts Challenge gave me the motivation to make a "hello" card for one of my ex-neighbours who is now in a retirement village after his wife and one of my bestie crafting buddies passed away.

Allsorts want us to use a sentiment (so that is extremely easy) and TCC has a Colours of Fall inspirational picture.


I have used the picture as my inspiration but tried to stick to the colour palette approximately for my silhouette card using Gina K's Friendly Silhouettes stamp set. The saying comes from Altenew's Magnolia Butterfly stamp set. I have used Gina's masking magic to create my mask for the top. The colours of my blend are Fossilized Amber, Crackling Campfire, Faded Jeans and a teeny wee bit of Black soot. I didn't really have a blue like the boat in my distress oxides but am very happy how my blend worked out.

I am happy with my black card mat. I bought a pack of Francheville Black from my local Spotlight store and it's an American card size (11" x 8.5" 176gm) for the tiny price of $11 for 50 sheets, perfect for mats. I have used Lavinia Multifarious Smooth and Supreme white for my blending.


Supply List:
Stamps: Friendly Silhouettes (GKD), Magnolia Butterfly (ALT)
Distress oxides (RNG): Fossilized Amber, Crackling Campfire, Faded Jeans and a teeny wee bit of Black soot
Ink: Versafine Clair Nocturne Black
Dies: Master Layouts 1 (GKD)
Paper: As described above plus Mango Melody (SU!) for my card base
Other: Masking Magic (GKD), blending brushes (TE)
Challenges: TCC #181, Allsorts #698

Well I think this is a perfect card to send to Neville and hope he enjoys it.
✿ Karen ✿

16 October 2022

It is Springtime down under

And the crew at Just Add Ink have an absolutely stunning inspirational photo to switch on our creative juices this week. This is a gorgeous inspirational photo which matches the perfect Spring day in NZ I am experiencing today. There are still 4 days to play along with the challenge if you would like to join in too or just check out everyone else's beautiful cards.


I knew exactly what stamp set I would use to try and KReate a field of flowers; my Painted Daisies from Pinkfresh Studios with it's coordinating 6 layer stencil and die.

Now I have to be honest this is my first go at colouring up with 6 layers and I was certainly able to add a lot more depth to the images. I got a bit confused what stencil I was using so I probably did one layer wrong but it is certainly very pretty and colourful. I love the green combo I ended up with my for my leaves it wasn't my original intention to use this combo and not sure if I have seen it used before but I think it works really well: Mint/Fresh Pear/Meadow. I stamped with a light grey ink (Misty Coast) before blending. I have to admit the sentiment was in my left over sentiments but I feel it works really well, I do love The Ton's easy expressions sentiments where you can layer up 2 colours or one embossed like below, it is really effective.


Supply List (all PFS unless stated otherwise):
Stamps: Painted Daisies (matching stencils and die), Easy Expressions Birthday (The Ton)
Ink: Misty Coast, Mint, Fresh Pear, Meadow, Sunshine, Apricot, Persimmon, Coral Reef, Passionfruit, Candied Apple, Versamark, Versafine
Paper: Neenah White, #110 Lavinia Multifarious smooth and supreme (the layer I blended on), Petal Pink (SU!), Mint Macaron (SU!)
Other: Dotted Scallops coverplate die, gold metallic pearls, stamping foam squares,  A2 Layering dies (WF), gold EP
Challenges: JAI #625

Excited to share my card was picked as the winner this week.


✿ Karen ✿

Party Like A Panda

CAS on Friday's latest challenge was asking for black, white and one colour. I'm not sure what thought process goes through your head when you "think" about a challenge.....often I have to go away and think a bit and then come back with a few ideas and then go no, no, no that won't work when you "map them out" on a card.
This challenge I had a lot of ideas with flowers and then thought about reindeers with ugly Christmas jumpers (I was going to add a pop of one colour to the jumper) but I think the final idea is perfect, as pandas are black and white!

If I was KReating a birthday card I thought I would combine it with the challenge at AAA Birthday which is to use your favourite technique. I am in love with stencils and how they just add a little something to take your CAS card and give it a bit more wow. So stenciling is my technique.


So time to party.....like a panda. 


One of the coolest things about CAS is that you need minimal supplies when you start to put it all together. Pictured below is my supplies minus the stamp set and die (Party Like A Panda - SSS August 2019 monthly card kit). 

I have Copic coloured the hat, paws and party favour with 3 Copics (RV21/23/25) in different blends of the three. I cut out 2 extra diecuts of the panda out of scrap bits of white in my box to give him the tiniest bit of dimension.

Last but not least a wee bit of blending through my stencil (Party Confetti - HA).


I think this is a really cool birthday card and the font is just perfect for wanting to party.

EDITED: My card was chosen in the top 3 for AAA birthday.


✿ Karen ✿