30 December 2022

Relaxing with my Copic colouring

Gosh Summer has arrived in New Zealand with a bang, just in time for Christmas holidays and instead of a gradual build up to the heat we've gone from asking is Summer ever coming? ... to it has arrived!

Post Christmas, I'm feeling pretty relaxed and hiding from the sun, so I have been playing with my Copics. I spent a few days working on my monthly marker class with Kit and Clowder "Holiday Charms" which is coming along great but it's also quite intensive and I have to concentrate as lots of small details.


So before starting on the frame, skin and hair etc I decided I would spend a few days doing some easy cute colouring. So I had a go at making the first card that Kelly and Jenn taught with Beary Rainy Day for Lawn Fawn's Create with Us series. This series is something I have only discovered recently and each session has a wee handout with cutting and colouring instructions and pictures of the final card. There is a video you can create along with or in my case I watch and make a few notes on the handout, then go and create at my own pace. But the pace live is very relaxing and doable. The colouring is cute and easy but I learnt  how to use "Liquid Stardust" plus there were quite a few steps in it's creation.


I have pretty well followed the list of supplies as per the handout. As I don't own Hickory Smoke distress oxide I used Iced Spruce instead, as that oxide has a hint of green in it I added a bit of G00 and G000 to the umbrella colouring. I don't own many Toner grey markers in my Copic collection so used Warm greys instead. I also don't own the die that they used to make the bow but used another Lawn Fawn die "Christmas Garland". Strathmore Bristol smooth paper was used to do my blending on, distress oxides love it.

I have never used Lawn Fawn's liquid stardust before and the sparkle is real fun and different but I was nearly going to remake my blended piece as had some bleed under the stencil. I had a big blob at one spot but the wee jumping frog covered it up perfectly. I was in a rush to get out the door to go shopping and wanted to get it down so it could dry whilst I was away, so note to self take more time next time but it is a really fun accent and looks amazing on the "SPLASH".


Well I enjoyed making this card immensely. I have to say since discovering Lawn Fawn and all the great tutorials I am sold. They really do videos on how to use all their products with lots of suggestions from the DT plus these free Create with Us classes have so many resources we can use with all our stamps.

26 December 2022

Top 6 for 2022

Just mucking around as we head towards the end of the year and have just discovered Adobe has a FREE collage maker which is really easy to use, so thought I would share my favourite SIX for 2022, some of these were my pick of the month but some may have been the runner up for the month and the stamp set had already been chosen earlier in the year's pick so didn't want to re-choose the "same again".


I love colouring in wee things (my favourite thing to do in card making). 

The right hand size are CAS (Clean and Simple) and I would say are "my typical style".

Thirdly, I enjoy making a blend.

Lastly, 4/6 of these were made for card challenges. I have thoroughly enjoyed challenges and they certainly can be helpful as you have guidelines to follow but often you have to read outside the lines to make it happen and I look forward to more challenges in 2023.

✿ Karen ✿

23 December 2022

CAS Christmas Card and it's turned out to be my favourite card made in December

I love CAS and a lot of white space and one of the things I have loved this year is my CAS challenge sites.  I was really delighted I won the challenge at CAS on Friday "sparkle challenge

So it is my utmost pleasure and delight to present to you definitely my LAST Christmas card of 2022 for their Christmas challenge. It's great to have a spare card and a box of chocolates wrapped in case an unexpected visitor turns up bearing gifts and being CAS you can whip up a card really quickly. And if not used you have started on your Christmas cards for 2023 ;)

I have used this card design multiple times this year with different images and different embossed backgrounds. 

I am absolutely loving this cute wee reindeer and think I am going to colour up a few more for gift tags now.


Supply List:
Stamps: Holly Jolly Santa (MFT), Merry & Bright (SSS)
Ink: Memento Tuxedo Black, Versafine Clair Nocturne
Paper: Xpress IT blending, Neenah White
Dies: Holly Jolly Santa (MFT), Square Peekaboo (MFT), Additional A2 layers (WF)
Other: Whimsical Woodland 3D EF (SU!), Quickie glue pen (Sakura), Dazzling Diamonds glitter (SU!), stamping foam

Copics Used:
E33/37/51/53
Y02/06
R20/35/39
RV21
YG21/25
W5

Well I sincerely wish everyone a very Merry Christmas and if you have time hope you can join in with me and play along with CAS on Friday's "Christmas Challenge". 

 And I have chosen this as my favourite card made in December, which is too funny as I whipped this wee cutie up in a flash but it is a seriously cute reindeer.

✿ Karen ✿

22 December 2022

December's pick is coming....

Looking at my December blog posts that you have seen already I can't go past as my favourite what I have scheduled to post tomorrow as my favourite for December.

I love, love the card I have scheduled for tomorrow so check in after my 10 pm so in reality Christmas Eve day in New Zealand.  I am guest designer for CAS on Friday which is actually a nice place to be finishing of my blogging about me for 2022 with a guest designer post.

I will blog the homemade cards I have received before the end's year sometime between Christmas and NYE.

I have so enjoyed the challenge of doing challenges and my virtual card classes this year. Both have pushed me so far out of my comfort zone it has been great and I look forward to sharing and creating more in 2023. So please do check back in a few days to see my pick for December.
✿ Karen ✿

Being a TEAM

As they say: there is no I in team and a great team needs a great team leader. When I re-signed as a demonstrator for the 2nd time with Stampin' Up! having a team leader close to me was important but also doing things as a team were extremely important and to be honest that maybe even more important now as we are still going out less as we live with Covid etc.

I was very fortunate the team leader I chose was Rhonda Fawcett from Matamata, the team leader of Star Stampers. She schedules regular get togethers and an annual retreat and even though I am no longer part of the team she still invites me to team get togethers which I really appreciate so I can stay in touch with the team which is scattered all over the Waikato/Coromandel/Bay of Plenty region.

Imagine my delight when she visited me yesterday to drop off my Christmas Card plus bought along a card kit from a recent class of hers for me to make. 


Supply List (all SU! apart from my Versafine ink):
Stamps: Oceanfront
Dies: Palm Trees
Ink: Balmy Blue, Coastal Cabana, Crushed Curry, Versafine Clair Nocturne
Paper: Basic White, Basic Black, Coastal Cabana, Crushed Curry
Other: Seabed 3D embossing folder (retired and in my stash), black twine

Wasn't that sweet of her and I highly recommend her as an upline. If you live near Matamata you could also contact her about classes or attend event also. You can email her HERE.

Sale-a-bration (SAB) is about to start January 1st until February 28th, also they have a new mini catalogue (January-April) also being released. If you love Stampin' Up! you should join in Sale-a-bration every year, your kit is totally customisable and you get to choose $285 worth of products for $190. Your products can be from any current catalogue including the new mini. If you join in SAB you also get a wee pressie as well and this year they are giving you the choice of a mini Stampin' cut and emboss machine valued at $133. You also get the choice of 2 colours the original white or a "balmy blue" version. There is no pressure to sell it's up to you you may easily met the quotas if you love stamping but if not you retire after 6 months and then you can rinse and repeat the next year and update what you want. If I didn't love to blog and use other companies products I would so do this as it's definitely more bang for your buck.

✿ Karen ✿

21 December 2022

Got to be pink to win in November

I can't decide between 2 cards in November and I love them both I love my flying pink pig and I also love my Furry and Bright class I did with Jenn Shurkus. I am really proud of my pink Furry and Bright card I created, as I didn't have what Jenn was using at the time apart from the base stamps so I made it "my own version" of her card and I think it may have turned out better than the original even if I say so myself. So the winner is PINK! this month.

The original blog post for the piggy is HERE.


And the original blog post for my furry and bright goes pink can be read HERE.


Wow nearly at the end now but that means it's just about that most magical time of the year and sharing it with our loved ones and family. I'll catch you tomorrow for December's pick.
✿ Karen ✿

20 December 2022

October's pick

Ahh the balmy days of October (before I got sick) and crazy me was in the midst of 2 virtual card making events and my pick out of all the cards I managed to blog from the events is this one from Pinkfresh Studios Holiday cardmaking event. Out of all the fabulous cards I made at the event I'm not sure why this one calls out to me as the best but I really like the colours and what a great saying!


You can read my original blog post HERE. Only 2 more months to go now I'll catch you with November's fav tomorrow.

✿ Karen ✿

19 December 2022

Anything but a card

Is the challenge at Just Add Ink this week which is perfect for where I am in "getting ready for Christmas".


Unfortunately all my tags are done and the presents already wrapped (though that is a good thing). 

I spent the weekend having a wee tidy up of my crafting space and this week I just wanted to do my next colouring class and make wee treat bags for Christmas breakfast for our guests. This year we are not doing presents apart for the "wee ones" but I had bought these cute Peekaboo Treat Bags from a SU! demonstrator mid-year, so I thought they would be perfect for the table. Word of warning even though the bag is a decent size they hardly open so you can't get much in at all. So all the chocolates etc. I bought will just have to be out in a bowl.


Supply List:
Stamps: Holly Jolly Santa (MFT), Merry and Bright (SSS)
Ink: Memento Tuxedo Black, Sweet Sorbet (SU!)
Paper: Xpress IT blending, Sweet Christmas DSP (SU!)
Dies: Holly Jolly Santa (MFT)
Other: Peekaboo treat bags (SU!), Sakura quickie glue pen, Sakura gelly roll white pen, dazzling diamonds glitter (SU!), Copic markers, mini stamping foam squares, Bearly Art glue
Challenge: JAI #634

Well two down, sixmore to go. The bags are decorated just need to do some colouring with my Copics, they were very "runny" today so think it's too hot to colour and I also need to go replenish granddaughters mini Smartie supply ;)

EDITED 19/12: Yah I managed to find some Jaffas so my bags for the table now have Rudolph's noses in them.

EDITED 23/12 My treat bags were a "honorable mention" for the challenge.

✿ Karen ✿

September's favourite

Was definitely the card I made for my dear wee grand-daughter who turned 3 this month.

I had been wanting to make a full size shaker card for ages so her birthday was just the perfect excuse Nanny K needed to do it!


The original blog post can be seen HERE and I'll catch you tomorrow for October's pick.

✿ Karen ✿

18 December 2022

August favourite card

WOW most of my cards in August I absolutely love but I have chosen for my winner my favourite stamp set of all time my Mondo Hydrangea (Essentials by Ellen).

It was used in a blog post celebrating the life of a DT member from one of my challenge sites and I love how card making is a chance for us to connect with people and fellow crafty people all over the world which is why it was a no-brainer this card would be my fav for August....

You can read the original post HERE.


I'll catch you all tomorrow with my fav' from September.

✿ Karen ✿

17 December 2022

My winner for July

Was really easy to choose. I just love this scene, it is so New Zealand which is why I chose it for my entry into "where in the world am I" for a challenge with AAA Birthday.


You can read the original blog post HERE.

I'll catch you all tomorrow with my pick for August.
✿ Karen ✿

16 December 2022

Fav from June

Gosh there were a lot of cards I made in June that I loved but I think my favourite has to be the wee butterfly I created (I ended up creating 3 cards if I remember rightly) when  playing with some color burst powders on watercolour paper and I went a bit crazy but then it was perfect to stamp and cut out the butterfly and then take 2 on the card was just right with only a hint of colour for the background.


You can read my original blog post HERE.

I'll catch you all tomorrow with my fav from July. I am enjoying looking back at all my blog posts from the year so hope you are enjoying the "pick of the bunch".
✿ Karen ✿

15 December 2022

The pick of May

WOW May is really hard there are 3 cards I love but my favourite is definitely this one I made whilst doing Online Card Classes Spring Camp, the original blog post can be found HERE plus a way to recreate the card if you don't own a wreath builder which I didn't.


I'll see you tomorrow for the best of June....
✿ Karen ✿

14 December 2022

My best of 2022 starting at April...

It's the end of another year and I think it's now 10 days to Christmas and 16 days to the end of the year so I thought I would look back at my stamping year and share my favs for the year. 

I can see by the lack of blog posts at the start of the year I was not really enjoying working with SU! products and one of the main reasons I stood down as a demonstrator was I really wanted to work with other companies products. So I am ignoring Jan-March as nothing that fab to share and laughing that my favourite card of April is using Stampin' Up! products!

You can see the original blog post HERE.


I'll be back tomorrow with my favourite card for May....

✿ Karen ✿

More Beachy Christmas tags

I am just in love with this set and when I saw Jenn Shurkus creating a card with it I thought I would change the colour combos I was using and do it the Jenn way. I was in the middle of making more tags and sticking them directly to boxes of Scorched Almonds for wee gifts. If you click on Jenn's name above it will take you to her video. 

The supply list is the same as the tags I was making HERE but have swapped to some old Real Red Bazzil card stock that SU! used to sell to match my boxes. I also changed the wave stencil to one I had bought from SSS called Surf and Sand as I really didn't like the one I used on the first lot and changed to Tumbled Glass distress oxide for blending the waves. I have used my Nuvo Crystal Glaze on the middle of the surfboard and for the sunglasses. Tiny drops also added to lights, then a sprinkle of glitter.

Copics used (darkest colour first):
Surfboard: YG09/05 and BG13/11
Coconut trunk: E37/33
Coconuts: E49/47
Coconut fronds: YG09/05
Lights (ROYGBIV minus the V): RV13/Y38/Y15/YG05/BG13 >> repeat
Santa's cap: R35/RV13/RV21
Santa's skin: E51 and R20 for cheeks
Santa's whiskers/beard: W2 on outside line
Shirt:  BG13/11 and RV21 dotted in middle of flowers
Pants: E37/33
Sun: YR04/Y38/Y11 - tri-blend in centre, rays are just Y11 with a thin circle of Y38


Inside says SEAsons Greetings ;)

Jenn had some good comments in the video and it is well worth watching and I would highly recommend doing a class with her even if it is just one of the free Create with Us class with her and Kelly, they are a really nice pace. One of her comments was when doing a scene card to not use too many colours, so the blends for everything are the same ie surfboard and shirt, surfboard and fronds in palm, tree trunk and shorts etc... 

Also at the first class I did with her at SCT Crop and Create Cardmaking delivered was that Lawn Fawn's stamps outer lines are a little thicker and make Copic colouring easier. At that time I was colouring up squirrels and sunflowers and she was so right. The other cool thing I am discovering with Lawn Fawn is that they only have a few releases a year, they don't retire stuff that often and the sets all work with each other as all approximately the same size, so you will be seeing more Lawn Fawn in my card making next year.

✿ Karen ✿

12 December 2022

Holiday Home Marker Class is completed

Absolutely rapt that I completed my monthly class before the new class is released on the 15th, I haven't done that since I first started Copic colouring and coloured and coloured and coloured. 

This month's class at Kit and Clowder was so stinking cute I was ready to colour it up the day it was released. I printed it out and got out all my markers then relapsed with my head cold/bronchitis that keeps giving and giving. 

So the fact I have finished it on time makes me so happy. The things that make me so happy about the image are I drew that rock wall and coloured it and even more rapt with the pine needles. I can not believe each needle has 3-4 Copics and then outlined with a Prismacolor pencil and I DID IT! 

The only things I would like to have another go at is the big green leaf and the squirrel's tail which is not bushy enough. At the moment I am not feeling confident enough to add snow with my white gel pen but I am rapt with my efforts.


✿ Karen ✿

8 December 2022

More Christmas "tags"

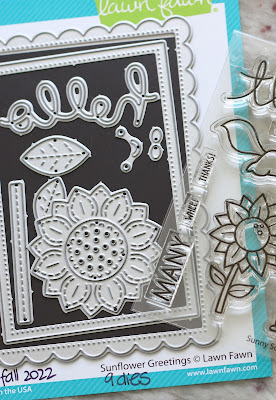
This "tag" has been created with Lawn Fawn's Sunflower Greetings dies which were part of my SCT Crop and Create Event class kit. It's a really cute stitched scalloped rectangle and a smaller stitched rectangle plus a lot. After this event I started on my buying Lawn Fawn products and as yet this set hasn't been released for general sale but something similar in your stash would work as well.

This is a snap of the dies snipped from the rest of the class kit.


This year we have made a conscious effort to only buy Christmas presents for children that are school age or younger. Now Pete has 2 teenage nephews at high school and I didn't think they would like my really cute gift tags I had been making so decided on Beachy Christmas for them and as their movie money has ended up in an envelope with some money I decided to make a bigger tag to decorate the envelope.

I have Copic coloured the 3 images I chose to work with from the set and have listed the colours used below:


I have added highlights with my gelly roll pen and some dots to the coconuts and a wee bit of glitter to Santa's hat.


Supply List
:
Stamps: Beachy Christmas (LF)
Ink: Memento Tuxedo black, Early Espresso (SU!), Salvaged Patina distress oxide (RNG)
Paper: Xpress IT blending, Coastal Cabana (SU!), Crumb Cake (SU!), white scraps
Dies: Beachy Christmas (LF), Sunflower Greetings (LF), Landscape Borders (Wplus 9)
Other: Waves stencil (HA), Sakura gelly white pen, Sakura black glaze, Sakura quickie glue pen, Dazzling Diamonds glitter (SU!), stamping foam (SP), blending brush (TE), Copic markers

I can't believe how stinking cute these are!! Now all we need is some sun.
✿ Karen ✿

7 December 2022

Cute wee gift tags

Hi everyone I had a fun Saturday night eating nachos and colouring some holiday critters from Lawn Fawn with my Copics with a friend. If you follow my blog you will see I have done a Jenn Shurkus class recently and I have to be honest for colouring small critters Jenn's way is perfect. You normally only use 2 colours and it's a very simple but really effective way to colour. Now if you have ever been thinking of trying Copics she has a 101 FREE tutorial which you can read HERE and as you can see you don't need 100s of Copics to colour. It certainly would be a perfect starting point but if you want to colour in lots of detail Kit and Clowder where I do my monthly classes (link always in my RHS column) is IMO the best.

Back to the gift tags we used the Say What? Holiday Critters to colour and I have used the Say What? Gift tag dies to create these, the middle one is a mini shaker tag. This was the second cat I coloured and I really like it (I think I used E30/31/35 and C0/3/5). I bought this set as it reminded me of my  Ugly and Bright set, isn't that reindeer so cute in it's wee jumper. I also have to admit I chose colours using what is in the tin on my desk at the time and I am in the middle of my monthly colouring class. On the back of each tag is a To and From stamped as well from the Tiny Tag Sayings (also Lawn Fawn).

SU! card stock used for making the tags from L >> R  Crumb Cake, Real Red, Bermuda Bay, Terracotta Tile, more Crumb Cake, Sweet Sorbet, this is great way to use up scraps. 

The shaker elements are SU! Snowflake Sequins which are retired, as is the ribbon and twine.


I bought a very long time ago from Lawn Fawn the Tiny Tags Sayings and matching dies and this is the first time I have used them but they made making a tag very easy, again there is a to and from on the back from the stamp set.


This kitty is cute too, in fact they are all cute and they are for the grandkids pressies so I'll get to admire them whilst they sit under our tree waiting for Christmas day.

✿ Karen ✿

4 December 2022

The final reveal of the last card from my Pinkfresh Holiday cards

And I finally found the quick and easy with the make and take by Laura Bassen aka Laura Fadora. This could definitely be mass produced and re-created using any snowflake dies you have in your stash.

When I was watching the speed video of Laura making this card I was shocked she die cut out the snowflakes, then coloured them up with her blending brush. I thought I would damage it's little arms/dendrites but no it was surprisingly really easy and quick.


Supply List (all PFS unless stated otherwise):
Stamps: Christmas Sentiments
Ink: Fresh Pear, Aquamarine, Seaside, Versafine Clair Nocturne
Dies: Christmas Sentiments, Snowflakes coverplate, Large Snowflakes
Paper: Neenah White #80 for blending etc, #110 for card base 
Other: Gold metallic pearls, various stamping foam from my stash, blending brushes (TE), Bearly Art glue

Well I still need a few more cards so I think I will whip up a few more of these in different colour combos, so  you may see the next efforts. I must admit I was sad when I finished my last class this was such a great virtual event and I have already blogged about whether I thought it was worth the cost HERE

But I have signed up for the next one in February and can't wait.

#pfcreateandconnect
✿ Karen ✿

3 December 2022

Quick and Easy Christmas Card

Just sharing today a quick and easy card I made at a class with Kristine McKnickle aka Creative Stamping. I made it a free event she hosted to celebrate the mid-winter Sale-a-bration that SU! held this year!

I have to be honest that the dies we used were something I had overlooked in the SAB brochure but were probably the best item everyone should have chosen. They were a 24 set of dies called Tree Lot dies and coordinated with Trees For Sale stamp set. As well as the tree there were lots of other cute dies including the caravan and wee wreath. I must admit I don't really like fiddly but this was surprisingly easy to put together and oh so cute!! It was also created on a notecard that SU! sell, so smaller card.

I have posted this away to some good friends that go camping in their motor home all the time but blogging to keep a record as this is actually one of my favourite SU! cards I made at class this year.


I have to be honest I can't remember the colours we used but my best guess is Pool Party, Pear Pizzazz, Old Olive and Cherry Cobbler (or Real Red) looking at the snap.
✿ Karen ✿

30 November 2022

Learning to draw a brick wall

For anyone following my blog I am sure you have seen the odd post that I share my monthly marker class I do at Kit and Clowder. I actually love doing the classes and I am not sure why I find it hard to start them but this month's image was so stinking cute I jumped right in and actually printed out the digital image the day I received the class which is not a typical reaction. Here's Alyce's final colouring so you can see why I was so excited:

Of course I then relapsed with my head cold and 2 weeks later I start but at least it's still November so for me that is a first. 

Now blow me down with a feather I knew we were starting with the rock wall as I had seen the WIP's going up in our Facebook group. Little did I know I had to draw the rocks. I assumed wrongly they were part of the digital image. But I did it and surprised myself with how easy it was.


Now the reason I am blogging my WIP is that Alyce is sharing on You Tube this month Chapter 1 of our monthly class for FREE and it is actually very easy and well worth watching if you own any alcohol markers. In case you are wondering my monthly class costs me $20AUD/month and I receive one big class and a smaller bonus class each month.

Links are below for the video on You Tube, Kit and Clowder's website but I also have a link on the RHS of my blog anytime, it has lots of freebies on it - doing the free 101 markers is so good and I learnt so much. She also has colour blends and a bit of history if you are ever stuck for a colour combo on the website, the Facebook group is fun to join the members share all their colouring and there are a lot of free giveaways - we are just about to start the advent calendar so a great time to join the group. As well as alcohol markers she also does classes for pencils.

YouTube Video HERE

Kit and Clowder website HERE

Facebook group HERE

Well I am off to do Chapter 2 and my window today, it's a miserable day in Hamilton so a perfect day for colouring.
✿ Karen ✿

29 November 2022

Beautiful Snowflakes

This was the title of the second class with Pinkfresh Studios recent holiday virtual event. This class was taught by Carissa Wiley. I love Carissa's work which is typically pink with glitter.

Well she shocked all of us with her mint, tidal pond and stargazer blend but there was glitter and there was so much die-cutting!! The cards are amazing - unfortunately my photos aren't, now I try to blog but the cards are in the post yesterday, so ca la vie. 

The first card had a layer of die-cut snowflakes (double stacked) on the base card and I loved this look.  Then we die cut from a snowflake coverplate card panel the smallest art deco frame and then ink blended with the 3 inks. She recommended doing the lightest ink colour all over then doing the darkest, then filling in the middle with the mid tone and then blending any lines with the light and dark blending brushes. 

To be honest I may have preferred to ink blend; then use the coverplate die; then cut out the frame, as I obviously have too heavy a hand and ended up with a heavier amount of ink at the cut out pieces. 

It was then matted onto gold glitter paper and the sentiment was gold embossed onto vellum - this was actually the hardest thing - even Carissa had to repeat hers. You needed to be able to repeat stamp in your MISTI or stamp positioner so you got very clean letters. I think I failed. I tried Vellum paper and my Vellum card from SU! The card weight was better, the diecuts when cut out from the vellum paper curled too much - Carissa says she uses a 40lb weight Vellum but she didn't mention the brand. Even so this card is WOWTASTIC and we have sent it to Pete's mum, as we wanted to give her the best card from the series of fabulous cards I have made from the Pinkfresh event. It has layers of foam but I crushed everything really hard and flattened it a bit and it still fitted through the small letter opening in my NZ Post letter guide.


The second card was much easier and had a card within a card. Instead of a layer of double stacked snowflakes, we used the snowflake cover plate die to give dimension and texture. We added a coverplate die to the front and the inside of the card (the inside piece was trimmed 1/8" off the LHS). We then cut off 1-1/8" from the RHS of a standard A2 card. Then attached the smaller card  (6" x 4" - scored at 3") underneath . When we attached the smaller card it is blended with the 3 colours.

Again a shocking photo but I hope it is self explanatory. 


We used Vellum snowflakes to make it a bit more ethereal and some gold metallic pearls. It is important to note that no vellum snowflakes should go beyond the RHS of the card, otherwise the dendrites will get damaged when the smaller card is open and closed. See below to how I decorated the front small card. By the way the arms of a snowflake are "dendrites" as a piece of useless information to save up for an episode of The Chase.

Success at last finally a photo that is in focus and again this is a rather special card.


Supply List (all PFS unless stated otherwise):
Stamps: Christmas Sentiments
Ink: Mint, Tidal Pond, Stargazer, Versamark
Dies: Christmas Sentiments, Art Deco frame, Snowflakes coverplate, Large Snowflakes
Paper: Neenah White #80 for blending etc, #110 for card base (I tried blending on Hammermill and Lavinia smooth and multifarious but I liked the Neenah best which was extremely interesting), gold glitter (SU!), Vellum Card (SU!)
Other: Gold metallic pearls, Gilded embossing powder (BM), various stamping foam from my stash, blending brushes (TE),  Bearly Art glue, MISTI.

Well I am weeks behind finishing of this event I think this was "where I was at" when I came down with my cold/flu and disappeared. I had done all my die cutting before I got sick but there was a lot of work in the first card especially. I may try her pink version with white glitter paper next year for a special person or two. 

I only have Laura Bassen's make n' take to do for this class and then I will be finished which is sad and I will be counting down the days to their next virtual event late February 2023!

#pfcreateandconnect
✿ Karen ✿

28 November 2022

I can taste Christmas is getting closer

I am a guest Designer at AAA CAS challenges for small and few plus baked goods for the upcoming fortnight.


I have some teeny tiny gingerbread people when I went looking and thought you can never have too many Christmas cards.


Supply List:
Stamps: Tiny Gingerbread and matching dies (Lawn Fawn)
Ink: Memento and Versafine black
Paper: XpressIT blending, Polished Pink (SU!), Neenah White
Other: Copic markers, White gelli roll pen (Sakura), Pop Of Colour (scrapbook.com), Layering Squares framelits (SU!), thin foam squares (SP)
Challenge: AAA #229


Well I think my card looks good enough to eat, it has ended up being a 5x5" square card so I have enough white space. I hope you can join in with us. I love AAA challenges, as its a bi-weekly challenge so lots of time to think and then participate.

Thanks for popping in.
✿ Karen ✿

22 November 2022

Is this the best layering stencil I have used to date?

I am talking about The Ton's Peony Print layering stencils (7 layers). I blogged a few days ago about my Eat Sleep Crafty Retreat I signed up awhile ago for. Now one of the things the retreat wants us to do is work with what we have in our stash BUT they also supply a list of what they are using at the retreat, now 3 of the cards really went WOW to me and today's blog post is one of those cards. 

When I saw this card I could not believe how vibrant and cheerful it was. Then when I saw it was a layering stencil and it was actually available to purchase at Krafters Cart I just had to buy it and I also bought the big HI die (The Stamp Market)as well and the Glimmer rectangle plate (Spellbinders) too. 

In hindsight I felt it was meant to be because what are the odds that it would be available to purchase in New Zealand. Krafters Cart has an amazing range of products to buy but often we have to go on a waiting list for it to be restocked and that can take months.

This is the second card Justine Hovey taught us for one layer wonders, again I am not in a good head space with being sick and I actually didn't have my stencil covering my A2 card mat so I had to trim a bit off using my A2 additional layering die from Waffle Flowers. The stencil is 6 x 6" so I just needed to pay more attention.

Justine also taught us lots of cool tricks for using our Glimmer hot foil machines as well. I must re-watch as I didn't quite get my rectangles lined up straight (look closely at the main stenciled card it has a double row of hot foiled dots). 

I especially liked her label on her machine SHINY SIDE DOWN - that is such a perfect reminder and now my machine has the label too.


She also had marked out what the grid of an A2 mat looks like for lining up sentiments etc. and viola so do I now :)


This is such a cool card and I love you get 2 cards for one. I have used Amethyst glitter gems from Pinkfresh Studios on the "coloured hi" card. Inks used (all PFS): Seaside, Lavender, Candy Violet, Grassy Knoll, Olive, Marigold, Clementine.

Well that is the first class from the retreat finished and to be honest with all the tips I learnt I feel I have already got my monies worth from the event. Huge thanks to Justine I loved both her cards (Jennifer McGuire may have to be careful I may now have a new J in my life to stalk). 

#eatsleepcraftyretreat

✿ Karen ✿

20 November 2022

Eat, Sleep, Crafty Retreat day 1

What a cool name for an online event. I have to admit that sums my life up recently if I remove the crafty bit i.e. eat, sleep, retreat. My head cold of 5 weeks duration seems to have moved to my chest now and I sound terrible but actually I am feeling a bit better and had enough energy that I could get out of bed this morning and see the afternoon session for day 1 (it's a 2 day event). I signed up as Alyce from my colouring class was teaching a class and quite a few of the tutors I watch their You Tube channels.


The classes are run through a Zoom meeting and we can comment and one of the tutors answers our questions live which is just awesome. I managed to catch the last two classes live today and enjoyed them both thoroughly. As I am working at the pace of a snail at the moment I should be finished those classes in time for the videos of the classes I have missed to be uploaded (that would be my only criticism so far is that I feel they should upload them quicker but most of the tutors are crafting along with each lesson and putting their own spin and answering questions). Tomorrow I may catch card wars which sounds hilarious but I fear I will be missing it as I have to provide taxi service for picking Pete up after he drops a car in for a service). Ca la vie.

So Justine Hovey taught one layer wonders but unfortunately I was such a messy stamper and got ink in places I shouldn't of by blending past my mask and then random ink appearing in places I have no idea how. I had to cut my panel down to remove the over blending and add gems to cover up the ink spots so my card is not a one layer wonder but a THREE LAYER WONDER and I love it !!!


Supply List:
Stamps: Script (Indigo Blue)
Ink: Mint (PFS), Meadow (PFS), Emerald City (PFS), Versamark
Paper: Hammermill and Neenah White
Dies: Ornate Circle (PFS), A2 layers (WF)
Hot foil plates: Splatter Sentiments (SP)
Other: Glimmer hot foil machine, Satin Gold hot foil (SP), Jade glitter gems (PF), Gilded EP (BM), masking magic (GKD)

Well I seriously think this virtual event is worth signing up for and if you do it today you may get sent the links to see tomorrow's classes live but if not you can be like me and see them in a few days time. Click HERE if you want to join in on the fun.

#eatsleepcraftyretreat

14 November 2022

A wreath of presents

Another challenge card and another Christmas card so that is a plus in my opinion.

Addicted to CAS have an interesting challenge to use a present/s plus be CAS, so I had the idea I could use my Wreath Builder by Gina K Designs and use 2 small presents. 

I went with 2 non-traditional but fun colours bright blue and bright red-pink to play along with Less is More's Colour wheel challenge and then added some sparkle as it is Christmas and CAS on Friday thought we need more sparkle on our cards.

Now after constructing my wreath it was a bit blah so added another cute reindeer and their ugly jumper and Copic coloured him to match the presents and he also bought one too. So a big Ho Ho HO from me.

I know I have presents, sparkle and predominantly 2 colours used, I just hope I have enough white space for my card to be CAS but I enjoyed thinking outside the square or in this case inside the square so hope you have time to join in too.


Supply List:
Stamps: Ugly and Bright (LF), Yeti or Not (LF), Oh Goodie (SU!), Merry and Bright (SSS), Monster Fun (GSD)
Ink: Polished Pink (SU!), Tahitian Tide (SU!), Memento Tuxedo Black, Versamark
Dies:  Ugly and Bright (LF), Yeti or Not (LF), Master Layouts 3 (GKD)
Paper: Neenah Solar White #110, Pink glitter (CTMH), Xpress-IT blending
Other: Wreath Builder (GKD), Quickie glue pen (Sakura), white gelli roll pen (Sakura), dazzling diamonds glitter (SU!), stamping foam, Copic markers


EDITED: My card was chosen as the winner at CAS on Friday's "Sparkle" challenge


✿ Karen ✿