29 February 2024

Citrus Twist with Lea

Sharing today my second class from my Pinkfresh Studio Create and Connect and today's card showcases the lovely Citrus Twist stamp set, dies and stencils. Our teacher for this class was Lea Lawson who is the marketing director for PFS and she often shares creating cards with their products via YouTube and monthly classes in Zoom. 
These were quite simple cards to put together as the stamp set is one piece but we did a bit of surgery to create extra citrus fruit. The wee flowers and leaves die-cut out separately but were part of the stamp. Both cards used our essentials from our swag, the Stitched Octagons coverplate die, Notched Corner Frame dies, gems with gold dust and for card one a sentiment from the Extra Special Sentiments stamp set.

Pink grapefruit and lemons card:

The images were gold embossed before stenciling and die-cutting out. It's a really fresh colour combo. This was actually the first card I made at the event as Class One was live whilst I was sleeping and I think I maybe a bit heavy handed with my ink blending but it's still really pretty and lots of little details.

Oranges and lemons card:


I really like how we've used our Versamark (embossing) pads to add some random ink to the frame before pouring on the gold embossing powder. The embossing powder Lea used looked amazing like a burnt gold (she said it was an Iridescent gold powder, I thought she said from WOW but they don't make one but Hero Arts does and I own that so might try it out) - see her cards lower. We used up excess ink on our blending brushes to make a delicate background on the coverplate die panel, you also see the gold dust in the gems they provided as part of our swag, they're really pretty. The sentiment on this card came from the Citrus Twist stamp set.

Lea's cards sneaks (and again I think she's done a fab job teaching us our cards):


✿Karen✿

28 February 2024

Not just cards

The sun is shining again so just a very quick blog post today, I thought I'd share the joy and camaraderie of crafting with friends. I was very fortunate to be able to share my weekend away at a friend's crafty space, as it turns out she also got some candid moments on her camera. So a big, big thank you to Denise and Jackie for making it such a fun weekend.

Start of the first day Jackie and me are concentrating hard at this stage.

Time for lunch (and a wee glass of bubbly).


Ready for Mindy's Class:

Chicken pie for dinner anyone (and salad and bread and wine). I made Annabel Langbein's easy smoked chicken and mustard pie which I have modified to make super easy. 
  • In an essence mix in a bowl one diced (sliced or shredded smoked chicken breast ~300g), add a tub of sour cream (250g), 2 Tbsp wholegrain mustard, good handful of chopped parsley, zest and juice of a small lemon, salt and pepper. 
  • In a flan/pie dish line with baking paper and add one sheet of thawed ready rolled flaky puff pastry ~11" x 11" - I use Heritage Bakers brand now Edmonds no longer available
  • Add mix in middle, leaving gaps at side to wrap the "pie" up
  • Add another square of pastry on top so the points this time point to middle of first square. With a pastry brush wipe all edges with milk and fold and squeeze them together. Make a few slits on top and bake at 200oC for approx. 25 minutes

End of a long day, 15 hours later and looks like I may have lost my marbles or I maybe laughing at myself for losing more embossing powder on the floor again.

Next day hard at it again for Heather's Class:

And what I returned home with - 4 of the 6 classes completed and some beautiful cards and great memories. So still 2 more classes to do and all the make n' takes plus playtime.

Pinkfresh Studio have already announced their next class dates for 2024. Click HERE to see more details. They also run Scrapbooking events too.

Thanks for popping in.
✿Karen✿


27 February 2024

Fluttering Butterflies with Anett

Sharing today the first class from Pinkfresh Studio Create & Connect which I participated with 2 friends in Auckland over the weekend but worldwide there was a total of 1270, I know of at least one other kiwi who was registered but her hubby wasn't feeling well so she crafted at home. This class was using a wide washi tape with it's corresponding stamp set, dies and stencils. It was a collection of butterflies and leaves and appropriately named Fluttering Butterflies. The class was taught by Anett Gelenscer who interestingly leads PFS Scrapbook Creative team but OMG she is so talented and so kind and nice. I loved her cards she taught us both had fancy folds, so she can card make as well all right. 

We received our class kits and essential items and swag in a beautiful but sturdy cardboard box with a magnetic lid. It was just the right size to transport all the ink pads I needed for the event to my friend's Denise's place in Auckland so it will remain for a long time in my crafting supplies

Here is my cards from this class together in front of the box.


As well as the Fluttering Butterflies suite of products we also received in our kits Stitched Octagons coverplate die and a set of Notched Corner Frames dies, both of these products were used on both cards.

The first card we white embossed the stamped image and then blended from the tips in leaving the centres light/white. We then made a shadow box for the die-cut images to be mounted on the front of the card. Plus I still have left over images to use on another card. We swiped the inkpad around the edges of the card base to make a Eucalyptus green card front and then also used the ink left on our blending brushes to shadow under where the images were going to be mounted.


The second card was even easier as we just placed a length of the washi on some white card stock and then cut out the images with the corresponding die. Again I have more images I can use on another card. PFS washi is amazing, the images are gold foiled and are so luxuriant. If they release this set I am definitely buying more of this washi tape. I think one roll has approximately 32 "image panels" per roll. For this card we made an easy Easel Card. I think the die cut frame piece is just perfect for attaching the washi die cuts.


And the official class picture showing Anett's fabulous creations:
She obviously did an awesome job of teaching us as I'm pretty rapt that mine look pretty similar to hers and are FABULOUS even if I say so myself;) Even my partner commented when he saw the bundle of cards I returned home with that they all looked amazing. So stay tuned for next blog post to see more fab, fab cards.

24 February 2024

Pinkfresh Create and Connect Virtual Cardmaking Feb 2024

Wow it's time for another fab and fabulous Virtual 2-day Cardmaking event with Pinkfresh Studio to start in less than 24 hours. I'm joining a few crafty friends in Auckland so hope to get 4 of the 6 classes completed. Pinkfresh Studio (PFS) have collaborated again; this time with Pretty Pink Posh (PPP).

This time the presenters are Lea and Heather from Pinkfresh Studios, Mindy Eggen representing PPP. They are also joined by some of the fab PFS design team Anett Gelencser, Yana Smakula and Jennifer McGuire, what a rock star line up.

I've had my beautiful box for quite awhile, so much so I lost all the goodies and homework a few weeks ago and went into a blind panic as I had put it away somewhere safe but luckily I found where I was keeping it safe - under my splat box. The joys of working and storing stuff in a tiny space!

The box inside the brown box was beautiful and so full the magnetic closure was struggling to keep it all closed.


Opening the box up, the instruction booklet and every class bagged up plus "our essentials/extras in another zip bag".

Spreading out:

Sneak peeks of some of the cards:

Well this event with PFS (whilst I still have room to fit in a bit more into my shelves) is one virtual card making class and kit I wouldn't miss as it's great value and always stunning cards and stamps and coverplate dies and etc etc.....

Hope you all have a fab krafty weekend too and I'll catch up next week with some fab, fabulous cards to share.

#pfcreateandconnect
✿Karen✿

22 February 2024

Masculine Birthday Card

Doesn't the 3 words in the title make you grimace. It's my SIL birthday soon and he's a keen golfer so I thought I would play along with a few challenges to help get me started.  CAS Colours & Sketches has provided me with a sketch which was my starting point. CAS on Friday just wants boy/male and I'm getting ready to go away for a crafty weekend and I really wanted to acknowledge Time Out Challenges for celebrating their 10th anniversary/birthday, what a worthy achievement and definitely deserving a shout out!

The SIL is a keen golfer so I grabbed the SU! set I bought especially for him but went CAS this time, the last time I used it was 2 years ago and you can see that card HERE - it had a fun fold.


I've Copic coloured up the golf ball on the tee and made a background panel using an Argyle stencil and then matted up on a strip of Gray Granite card.

Supply List:
Stamps: Clubhouse (SU!)
Ink: Jet Black (LF), Poppy (C9), Sahara Sand (SU!), Gray Granite (SU!)
Paper: Sahara Sand (SU!), Gray Granite (SU!), Xpress IT blending, Neenah White #80
Other: Copics, Argyle stencil (PFS), foam squares
Challenges: CAS C&S #531, CAS on Friday #277, TOC #257


Well it certainly speed up the creativity block when you mention masculine adding some parameters from a challenge. Thanks for popping in.

✿Karen✿

18 February 2024

AAA Cards Challenge 259: anything CAS goes

It's an easy challenge at AAA Cards this week - anything CAS but with the option to add "birthday". Well a very special wee boy to me is turning 2 real soon so I tried to do a blue unicorn - normally I add a tad of pale pink to highlight the body - this time a tad of BG11/10 to the body. I think it looks quite sweet in these colours. 


I decided I wanted a blue cake as we were doing it boy themed and this colour combo is one Jenn Shurkus used in her Copic 101 class and I like it as the BG11 bleaches the other BGs in the mix.

Other colours chosen were almost random and what was on my desk from a colouring class but to the best of my recall this is what I used to colour in with, darkest > lightest.

Blue cake: BG05/02/11
Apricot icing: YR23/21/20 and 2 Pinkfresh inks Peach Fuzz and Apricot for the sprinkles
Unicorn body: BG11/10, R20 and BV29/25 for hooves - I like this combo instead of greys
Rainbow: RV13/21, BG 13/11, YG05/01, Y15/11, V06/04


Supply List:
Stamps: Cupcake Birthday (ME), Itty Bitty Birthday (MFT)
Ink: Memento Tuxedo Black, Versafine Nocturne, Apricot (PFS), Peach Fuzz (PFS), Waterfall (PFS), Pumice Stone (RNG)
Paper: Neenah #110, Xpress It blending 
Other: Copic markers, Confetti stencil (LF), Prisma glitter (LF), foam squares (SP), blending brushes (TE)


As always you have 2 weeks to create your card and so I hope you can join in with us and do check in to see what the rest of the Design Team  came up for the challenge. I'd also like to play along with Krafty Chicks Challenges (CAS and Birthday) and Craft Rocket Challenges (Birthday).

Thanks for popping in.

✿Karen✿

17 February 2024

Colourful Cats

I'm very excited that the AAA Card Challenge family is growing, as well as AAA Cards there is AAA Birthday and now AAA Colourful. Both the birthday and the colourful challenge are monthly challenges so lots of time to play along.

The first kickoff challenge for AAA Colourful is to be inspired by the colours of their logo. 


It's funny the old laptop in my craft room the colours looked like salvaged patina, blueprint sketch, wilted violet, picked raspberry, carved pumpkin and squeezed lemonade and those are the colours I worked with but now I'm sitting at my real PC with a much better/bigger screen I'm seeing the colour palate slightly differently but too late now the card is made.

I was tossing quite a few ideas around with working with a stencil but for some reason I recalled an old cat stamp set from MFT Purr-Fect Cats that I used to think  one of them looked like a hippy cat and thought it would be fun to work with. I've been inspired by a card I had pinned from MFT when they released the stamp set in 2017 where they had ink blended various colours on the "hippy" cat. I white embossed the cats onto the wrong paper again I used my watercolour paper instead of my Ranger Heavy cardstock and its hard to blend on the watercolour paper so I ended up swiping and blending with my blending brush where the colours intermingled.


When dry I  wiped the ink of the embossing and die cut out and viola...


I even had some kitty cats left over so I put one inside the card too.


Well I think this will be a really fun, colourful challenge and am looking forward to getting my fingers inky again next month :)


✿Karen✿

13 February 2024

CASE-ing Sarah Gray

Time Out Challenges have an interesting challenge on their blog at the moment to CASE one of their past DT Sarah Gray who now by the sound of it owns her own Stamp Company funky fossil in the UK.


We were given one of Sarah's cards as our photo inspiration. I really liked the big splat so thought I'd have a play. I found a stencil in my stash which helped me keep my Color Burst powders and Mysticals sprays under control. I found a few arty things amongst my AALL and Create stamps and this is what I came up with. I thought Sarah's splats reminded me of Sweet Mustard and brownish purple but I had nothing really like that but worked in similar but brighter shades, looking at the inspiration picture as I type my blog post I'm trying to work out how to add a tad of blue as I missed that detail when I glanced at the photo. Below is where I was before I thought there's blue in the inspiration.


Well it was really easy to add a tad of blue. I should have allowed it to dry naturally as it's a bit splodgy where I dabbed it to dry but it makes a huge difference adding the blue IMO to the overall balance of the colours.


Supply List:
AALL and Create stamps: Spread Your Wings #729, Power of the Word #754, Art Notes #906
Ink: Versafine Clair Acorn
Paper: Fabriano Artistico watercolour, Marmalade (C9 - retired), Natural White (SU! - retired)
Other: Solar Flare Color Burst powder (Ken Oliver), Gold Temple Mysticals (LAV), Pinkella Mysticals (LAV), Blue Blitz shimmer powder (Nuvo), no. 4 round brush and splat brush, 2mm foam squares (SP), watercolor wash freeform stencil (MFT), Master Layouts 2 (GKD)
Challenge: TOC #256

Well that was a really fun challenge I always like it when my desk looks like a craftastrophe as it means I've been having fun.

EDITED 22/2/24: I was chosen as the winner at Time out Challenges of this challenge which I'm not sure why but I am totally amazed that I could win a non-CAS challenge.


✿Karen✿

12 February 2024

Celebrations Delivered part 1

After doing three Crop & Create Delivered virtual events with Scrapbook and Cards Today I'd decided for myself last year that 3 was enough. They are awesome fun and you get so much stuff I nicknamed them #SCTbigboxevent but with 15-17 classes in a box with stamps/stencils/dies sometimes embossing folders etc. etc. there truly was no more room in my small crafty space for so much stuff, and if I'm honest a lot of it wasn't something I would choose to buy normally. So when they announced last year they too were getting burnt out and would be doing a one day smaller event with 1 kit being taught by 3 instructors and significantly cheaper I thought I would give it a go. 

SCT's next big box event is in September (Fall event) , personally I preferred the Spring box, it's happy and colourful. I 'm not into making and sending Fall cards, so the stars were aligning for me to be more frugal in my spending for Virtual classes in 2024 without me having to have willpower.

Well yesterday was the day for the new style of event and the first one was aptly named Celebrations Delivered, the instructors were Cathy Zielske, Mindy Eggen, Meghann Andrew and special guest Jennifer McGuire who did a special wrap up at the end; in the past she did her magic with all 17 kit products, this time there was only the one kit. 


Well we mayn't have got a big box but we sure got a big bag of dies, a big stamp set (6" x 8"), wee bag of clear sequins and 3 stencils in a mesh bag plus enough white card (80 lb. and 100 lb. for our card bases and panels, plus some gold card, acetate and vellum). 


In reality there was actually 40 dies, so really great value for the cost ($60 early bird and $22 shipping - all USD). We have been provided instructions and videos for 3 cards with each instructor plus some extra card ideas. There's also the bonus 30-minute video of Jennifer creating with the kit too.

The first class was kicking off at my 4am - 6am I decided sleeping was much better for me and set my alarm for 620am for the 7am class with Mindy but eek that was still too early for me, so went straight back to sleep and made Meghann's class easily at  my10 am-noon and I managed to catch the first card of Jennifer's extras. So even with it just being a one day event I still have lots of catch up to do.....the story of my crafting life.


Back to the cards first card with Meghann Andrew; this was my favourite of  "the official cards she was teaching". The beautiful bouquet of flowers was placed in our stamp positioners and stamped in one corner of an A2 panel using Pebble ink (C9), then the paper moved 180 degrees and stamped in the other corner. 

We then used our largest postage die to cut out, now this is where I think it gets pretty cool (but the Pebble stamped image is amazing too). We then glued down the outer frame of the A2 panel so the stamped image is on the edge, the die-cut is popped up and placed perfectly in the middle, I'm out a tiny tad but it still looks amazing. As someone in our group watching the video commented this would make a fab sympathy card, but the whole design concept would work for lots of stamped images and lots of different colour inks.


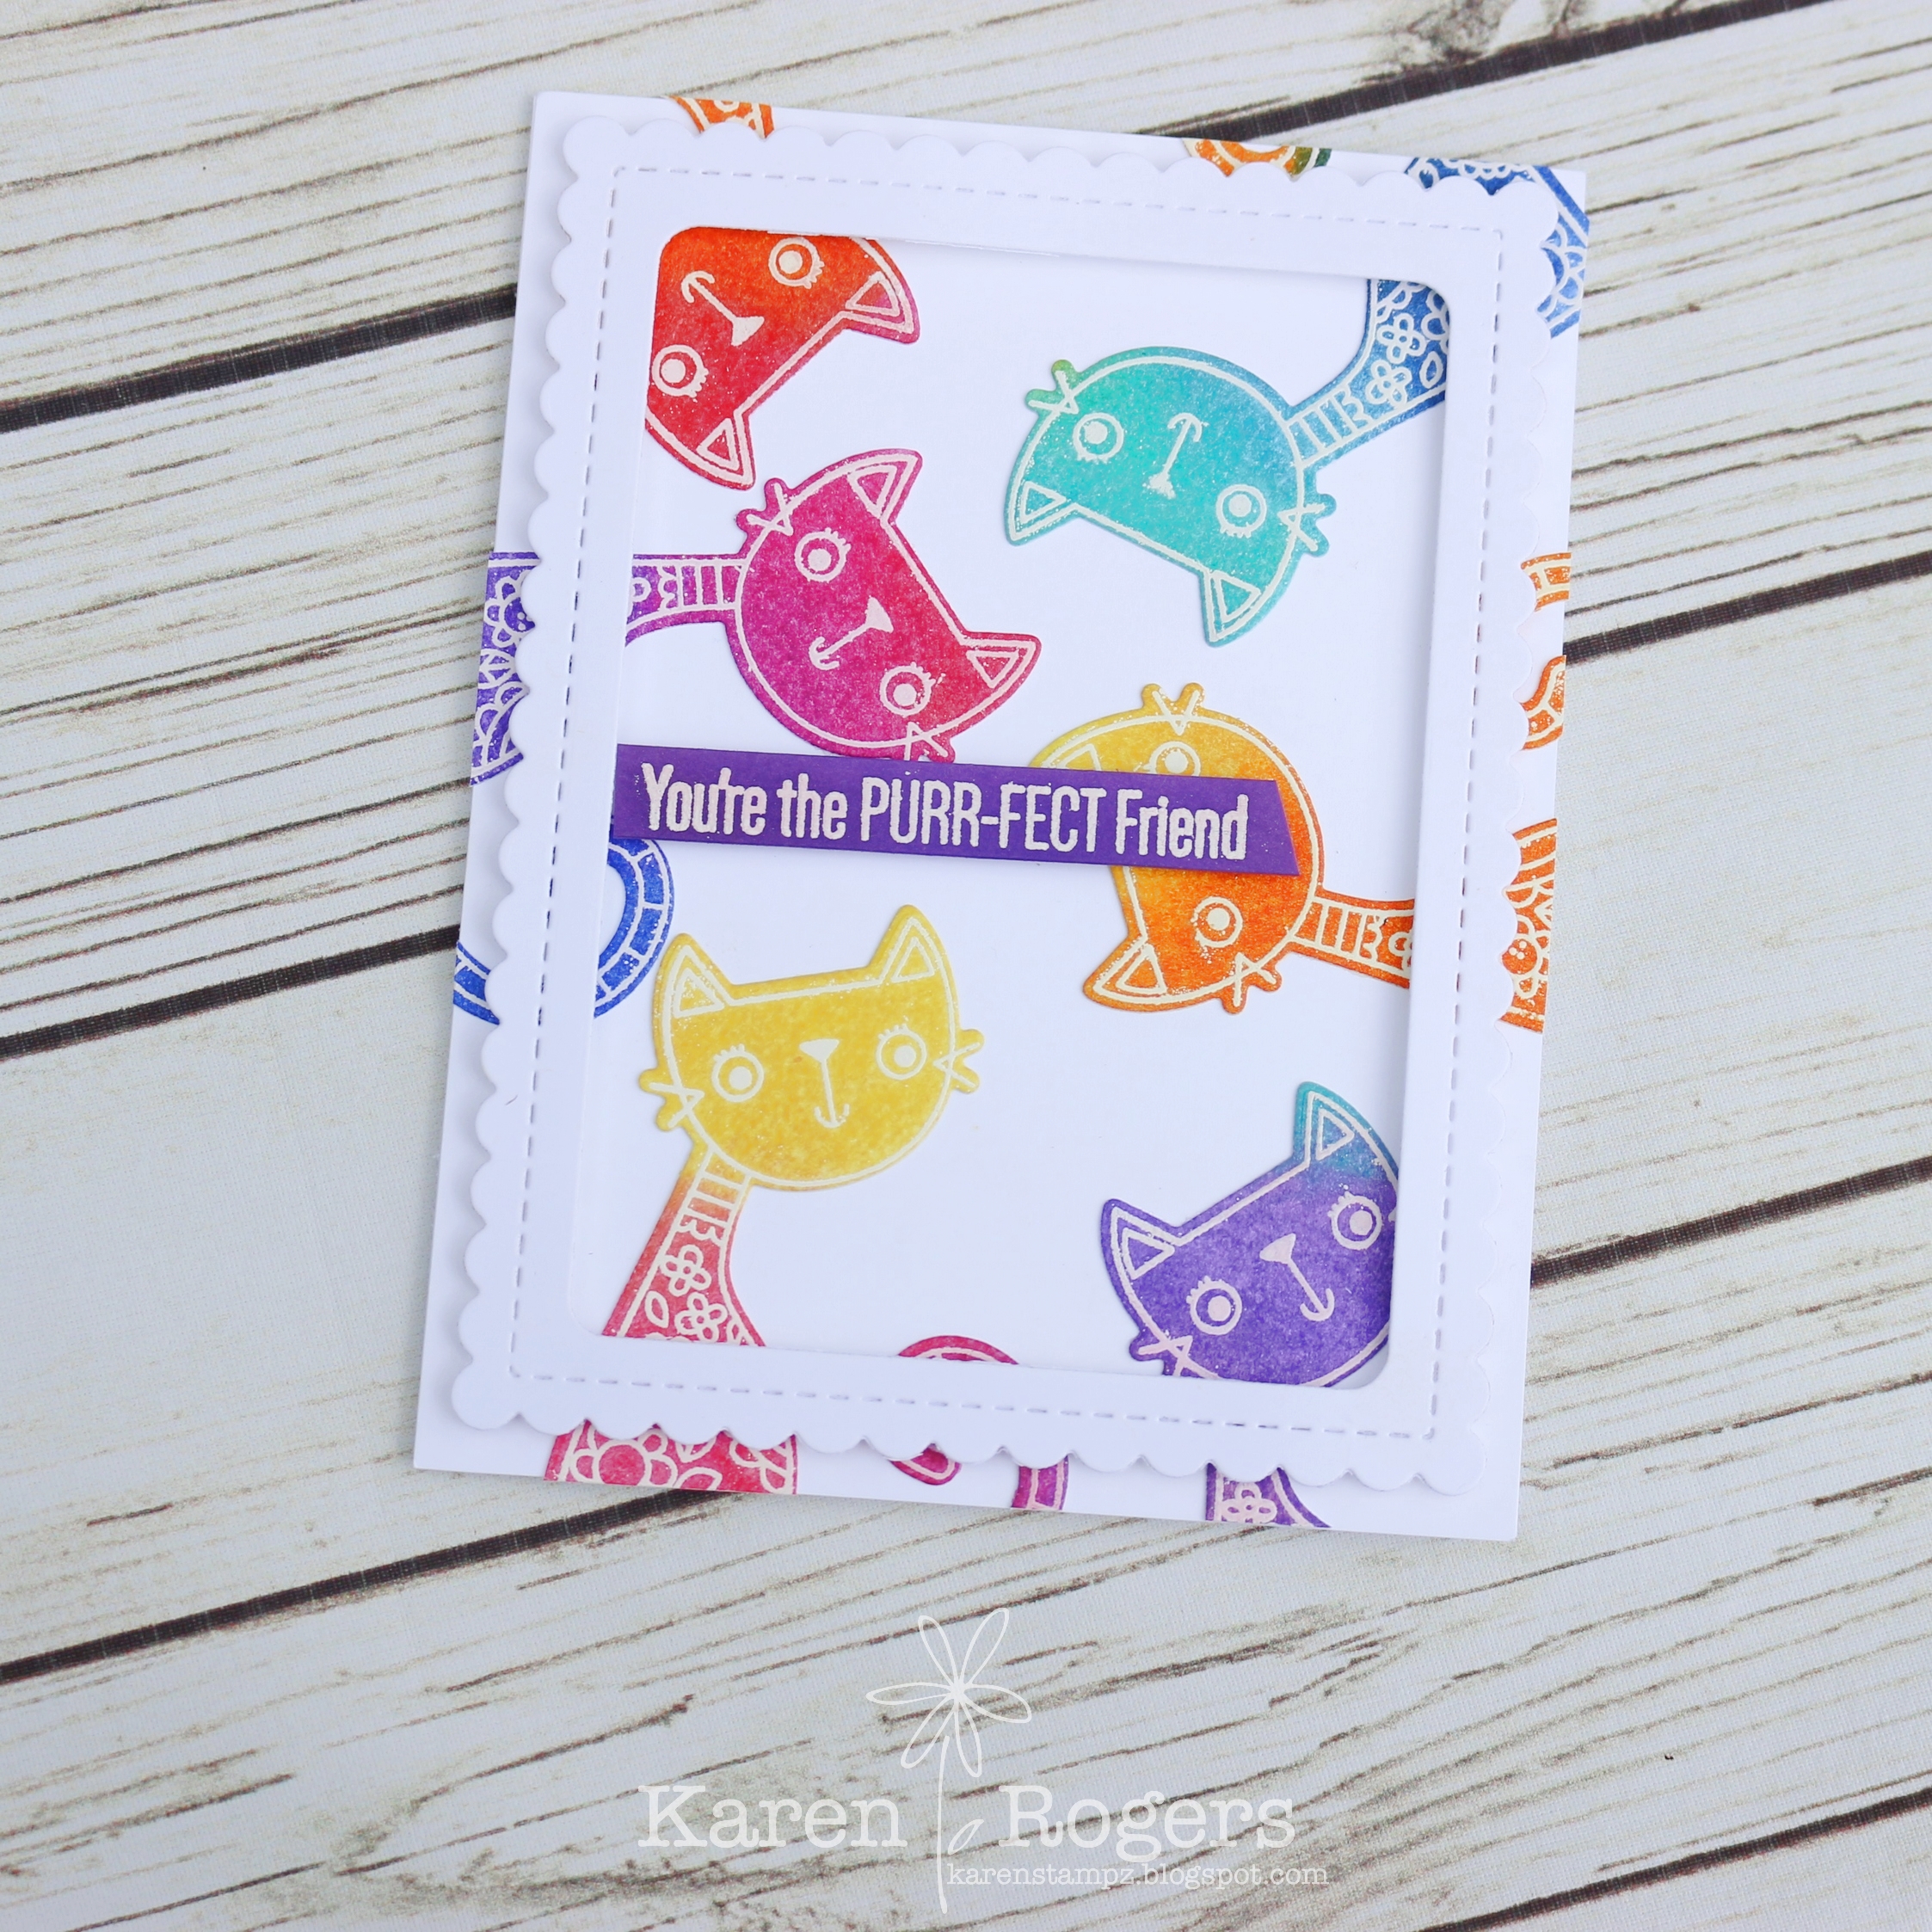
Next card and the coolest thing re this card is we have added tiny pieces of Vellum behind each window, someone in the group also said she filled hers with Glossy Accents which would also be very cool. But what a fun die. As I now have a bit of Concord & 9th inks, some as part of my kits from the "big box" and some because I bought it, I have worked with the same colours as Meghann: Pebble, Honeycomb, Sea Glass, Juniper and Grapefruit.


Last card we did some dry debossing with the balloon dies we received on our die-cut white panel and then used the stencil to add some pops of colours using the stencils to match the card stock used with the happy die-cuts, same colour palate as above (Honeycomb, Grapefruit, Sea Glass and Juniper - ink only on Birthday sentiment). We received as part of our kit a bag of clear sequins which have been placed in an uneven number down the middle as a squiggle but they are very subtle.


Meghann even had time at the end of her class to fit in showing us how to make one of her extra card suggestions. She kindly provided instructions and pictures of 3 extra cards and we got to vote in a poll which one we would like her to demo, off course we all chose the hardest.

As Jennifer doesn't provide instructions and her cards are always so wow I decided this time I would create her first card straight away so I didn't forget how she did it this time. It is a fab spin on the emboss resist technique.


  • This is a really clever idea and uses FOUR circle die cuts (4-1/4") which have been white embossed using the bouquet stamp in our kit, again the circle is placed into one corner of a stamp positioner, so the repeat stamping is "identical".
  • I have used some of my new Pinkfresh Studio inks which I love; Sunkissed, Mango Sorbet and Fruit Punch to blend a gradient. 
  • We only had to ink blend on one half of the circle as the other half is hidden underneath. The circles are then scored down the middle (2-1/8") and attached and folded to interlock around a square that is the same size as the circle (4-1/4"), then attached to a slightly bigger piece of white card stock (4-1/2" square) to hide the mess underneath.
  • Belly band was made of a strip of Vellum (11" x 1-1/2") and a sentiment attached. I also stamped with the lightest ink on the larger white square as I was a bit confused and thought that was the inside but the inner square is the identical size as the circles, but it still looks pretty there ;)
Well I am really rapt I signed up for this event, it is awesome value and I love that ALL the instructors are working with the same kit and all the cards we are being taught are all so different. But you'll have to wait for my next blogging of the event to see that ;)

I can warn you know that the next event like this that SCT is running is called Jolly Holiday and scheduled for the last weekend in July, registrations start next week for the "public", cost is $65 USD and $25 USD shipping to NZ. As I was an attendee of this event I was able to sign up already for a $5 discount but truly such good value either way I would highly recommend doing one if you can afford it. It will be great to do a Christmas in July event too.
 
✿Karen✿