23 June 2024

AAA Card Challenge 268: Sketch Challenge

Gosh this was another AAA Card Challenge that challenged me. Maaike had gotten in early and used the silhouette flowers ideas.


So whilst thinking of another idea I thought of having a go at making some bubbles. This is just one way I have seen them made on the internet. In a nutshell blend a very small amount of ink through a circle stencil in 4 light colours (yellow, pink, blue/purple and a green). Then you add highlight with white gel pen/posca pen and darken the edges with a pencil. So my first problem was limited range of pencils and it does make a difference, so inks were chosen to work with the pencils I owned. 

I made my circle stencil/mask with dies and some masking paper. I also used my new tiny blending foams from Ranger and I wasn't overly rapt with them but will try on another project. I probably should have used distress inks as have more blending options for them but I think the emphasis is on really light blending to try and make your bubbles translucent, so most of the ink you pick up gets tapped into the paper towel. My last bubble is a tad dark and I probably needed to create another circle mask as the one I was using had picked up too much ink which transferred then to last bubble. 


Overall I'm pretty happy with the final result for my first go, the sentiment comes from Lawn Fawn's Bubbles of Joy which seemed pretty appropriate. I have used one of the new in-colours from Stampin' Up! called Petunia Pop as it seemed to be a good match for my bubbles.


A few days before the blog post goes live and I'm still unhappy with my original card and decided to have another go this time adding a wee mouse from the Bubbles of Joy set and using Lawn Fawn's Bubble stencil and trying again with Distress Watercolor Pencils as I have been playing with them a bit lately. I'm happier this time, probably because the mouse looks cute!, plus the bubbles seem to have more life in them too.


I've used the Distress pencils on the stencil colouring in the outside with a line and then pulling the colour in with a barely wet brush. I saw Emily Midgett demoing and she wiped her brush on a damp stamping shammy and it is great for controlling the water on your brush - it really is a great tip! 

I used my Zig brush markers to colour in the wee mouse and this time I used Bubble Bath card stock from SU! for my card base.


Well I hope you can join in with us, as always you have 2 weeks to have a go, do check out the fab inspiration from the DT at AAA Cards and if you are stuck, have a go at making some bubbles ;)

I'll also play along with Addicted to CAS's Critter Challenge as I think the wee mouse is the cutest and s/he is having so much fun blowing bubbles.


✿Karen✿

21 June 2024

Using my most used stamp set for the latest Tic Tac Toe Challenge

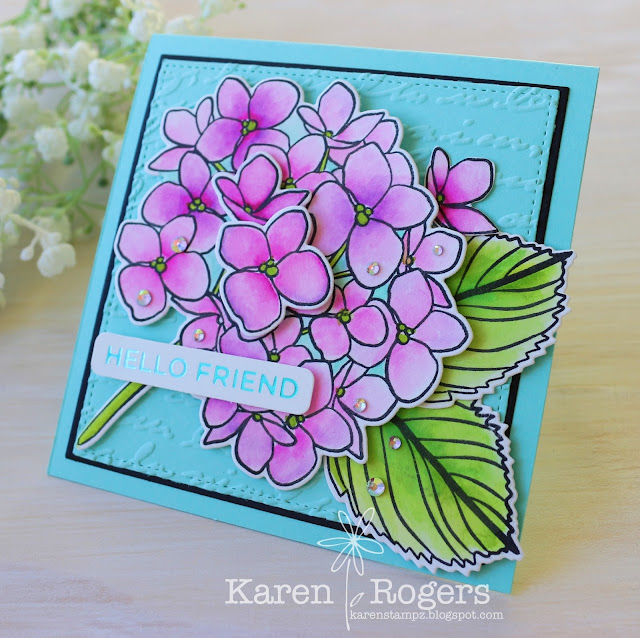
Hi everyone it's time for another challenge chosen at Tic Tac Toe. This is a fun board and to be honest I was seriously thinking about using all 9 elements on my card which would have been relatively easy; as it is I have 3 lines ticked off. I'm using an oldie but a goodie stamp set, Mondo Hydrangea which makes the most dreamiest of watercoloured cards.


I've used this design on another card with more muted colours which you can see HERE. But I've gone for the parameter "bright colours" as one of my choices. I've actually used a trio of lines; the top line (friendship theme, gems, layers); a diagonal line (friendship theme, flowers, bright colours) and the central column (gems, flowers, watercolouring).


I'm also going to play along with Colorful Options Challenges as they are celebrating Aqua as the colour for June.


I've used my Zig Clean Color Real Brush Markers to watercolour up the image blending the colours with a barely wet no. 4 round paintbrush as below:

Flowers: Dark Pink, Pink and Lilac
Leaves: Apple Green, Lime Green, Light Green, Turquoise Mint 
Wash: Turquoise Mint

I've also used a different Strathmore Bristol Paper to watercolour on, I normally just use the "smooth" but I'd read good reviews of the "vellum" so when my local craft store got some in thought I should try it and I can confirm that for me it was incredibly easy to blend on so it may become "my go to" for my Zigs.


Supplies used:
Stamps: Mondo Hydrangea (EBE)
Ink: Versafine Clair Nocturne
Paper: Bristol Strathmore Vellum surface, Mermaid (LF), Basic Black (SU!), Glimmer specialty (SP)
Hot foil: Everyday Sentiments II, Glimmer machine,  Teal glimmer foil (all SP)
Other: Pretty Print EF (SU!), Master Layouts 3 (GKD), Spectrum AB crystals (SP), Featured sentiments die set (ALT), 1mm and 2mm foam squares (SP)
Challenges: TTTC #250, CO June2024


Well this truly is a beautiful board to play along with and I hope you can play along too. As always you have 2 weeks to submit your card to Tic Tac Toe Challenges.

Thanks for popping in and hope you have a beautiful day.
✿Karen✿

18 June 2024

Clean and simple birthday card

Two of my favourite challenge sites have something I love "cute" at AAA Birthday and "embossing and obviously CAS" at CAS on Friday, so thought I could easily make a card to suit my style with those  parameters.

I thought I would play with a really cute Panda stamp set I had recently purchased which hadn't seen ink for a card but my grand daughter likes stamping with it for fun, the other thing I'd also purchased and been on the lookout for ages was MFT's rectangle peek-a-boo window. I've used their square one a lot but the rectangle is normally out of stock. I found a fun embossing folder so we were good to go and using a panda stamp I only needed a few Copics to colour up the teeny wee heart balloon, party hat and the cheeks.


Supply List:
Stamps: Cheerful Panda Moments (ASD)
Ink: Memento Tuxedo Black, Versafine Clair Nocturne
Copics: RV13/21/10 (darkest  > lightest)
Other: Bunch of Balloons 3D EF (ALT), Rectangle peek-a-boo window die (MFT), white Gelli roll pen #8, Prisma glitter (LF), 1mm foam squares (SP)
Challenges: AAAB#62, CAS on Friday #285


This was such a quick but in my mind really effective cute birthday card design so I am pleased I played along with both challenges.
✿Karen✿

17 June 2024

Going nautical with Jenn

I'm slowly working away at my Art Retreat box from Jenn Shurkus. This box is different than other boxes I've received in the past as more mixed media focused so working with Distress Watercolor Pencils, stencil paste and now Distress Paint which I have never used before today.

Again we were so lucky to get an exclusive stamp set curated for the event from Stampers Anonymous and Tim Holtz, the set contains 12 stamps which have been selected from various sets and resized for what Jenn planned to do. 


For this card we were working with 4 of the stamps in the set. 

We started off with a base of watercolour paper and smooshed some Salvaged Patina Distress watercolor pencil to "centre" of an A2 panel, dried it with heat tool and then splattered Walnut Stain paint in a diagonal, then used our dirty water in our cup to splatter on same diagonal before drying with a heat tool. 

We then applied a wettened Pumice Stone distress watercolor pencil directly to the script/ledger stamp and spritzed lightly with water if not wet enough and stamped on the LHS (yes LHS), restamped without recolouring or wetting below first stamp impression. Dry again with heat tool.

This is where I managed to swap the orientation of my paper and when I used my Saltwater Taffy pencil and stamped it 4x I stamped it  with the script ledger on RHS. Then we did the same thing with the row of numbers using Uncharted Mariner pencil, the first impression and wettest one is top RHS, and then restamped bottom LHS.

The anchor was painted with Uncharted Mariner, Jenn's reasoning for using paint was that it was opaque and would sit on top of what we had created underneath. We then coloured in the holes of the anchor with white paint (Spellbinder's Splatter White) and when dried filled in with Distress Collage Medium and then sprinkled with Distress Rock Candy.


The wordfetti is an emboss resist - white embossed image and then the card coloured in with the paint left over on our work space. This was when I realised my anchor was upside down compared to Jenn's card but truly it doesn't matter and I added my wordfetti strips on the LHS in the "white space".

 When everything was dry we chopped 1/8" of all for sides and then mounted on an A2 card base where we had lightly ink blended Uncharted Mariner Distress ink. I've added a few Champagne glitter drops from Pinkfresh Studio.

Well writing it down here there were a lot of steps maybe this is why I am slowly working my way through the kit but again really enjoying the process and letting go as you don't know what will happen or even if you will stamp the right way up ;)

Thanks for popping in and I should have more to share real soon as the cards are coming together really fast now as so much prep already done, so that's a wrap for card 13 from this box.
✿Karen✿

14 June 2024

Just Add Ink 706: Be Inspired

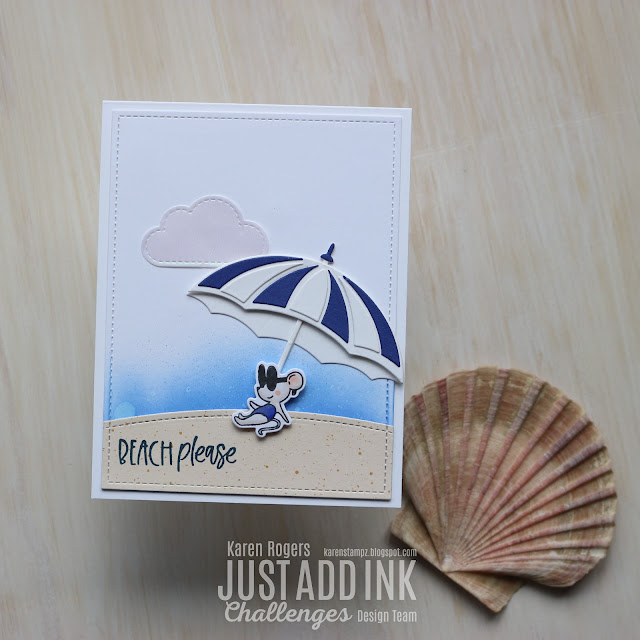
Hi everyone it's time for another fun challenge at Just Add Ink and gosh Kerry has chosen a really dramatic moodboard to inspire us this week, I was inspired by the fab blue and white striped umbrella to KReate my card.


By the time this card is posted I will definitely be longing for the beach as it will be cold and wet down under.

Supply List:
Spellbinders: Umbrella Bloom dies, Snowdrift card stock, foam squares
Essentials by Ellen: Beach Day (wee mouse)
Honey Bee: Flippin' Fabulous (sentiment)
Lawn Fawn: Inside Out stitched rectangles, simple stitched hillside dies, small stitched rainbow (cloud), pearlescent vellum
My Favorite Things: Sand, Surf and Sky 6x6" DSP
Stampin' Up!: Starry Sky card stock
Inks: Memento Tuxedo Black, Twilight Nocturne Clair, Blueprint Sketch Distress oxide

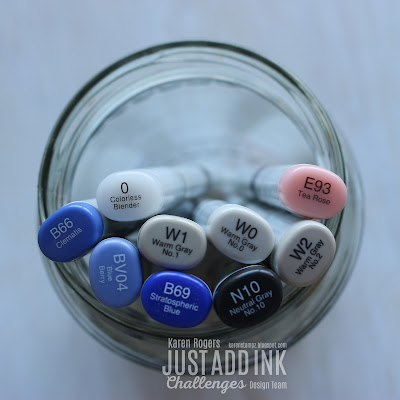
Copics used:


Thanks for popping in and I'm looking forward to seeing how YOU are inspired by the board.
✿Karen✿

9 June 2024

Masculine Card for AAA Card Challenge 267

It's time for another CAS Challenge at AAA Cards and this week the optional twist is masculine. Personally I like to play along with the twist as it gives me some direction for my card to get started but OMG masculine and CAS, now that is a challenge but the Design Team has some great ideas for masculine done CAS. Someone bet me to the plane so I decided it was finally time for one of my Simon Says Stamp kits from JULY 2015 to finally see ink!! The kit was called Sail Away. It's funny or meant to be BOTH the SSS Challenges are wanting masculine cards so will enter my card into their challenges too.

I have in my stash from about the same time a porthole die from MFT Stamps which I thought would be a great starting point. I found in my scrap bin some ink smooshing by the look of it with Lindy's Magicals or Nuvo Shimmer sprays as it definitely has a shimmer as well as the "splash" which I used as my background. The wee yacht has been stamped and Copic coloured up, fussy cut out on the stamped line and the edges darkened with a Memento dual tip marker.


Supply List:
Stamps: Sailing (SSS)
Ink: Memento Tuxedo Black inkpad and marker pen
Paper: Light brown woodgrain (LF)
Other: Oceanview porthole die (MFT), Copics, blue shimmer powder, 1mm foam squares
Challenges: AAA#267, SSS Monday (masculine) and SSS Wednesday (masculine)


I hope you can join in with us as it's great to have some masculine cards in your stash but anything CAS goes as well. Do check out the great inspiration from the DT to get you started.

Thanks for popping in.
✿Karen✿

3 June 2024

Be Fearless

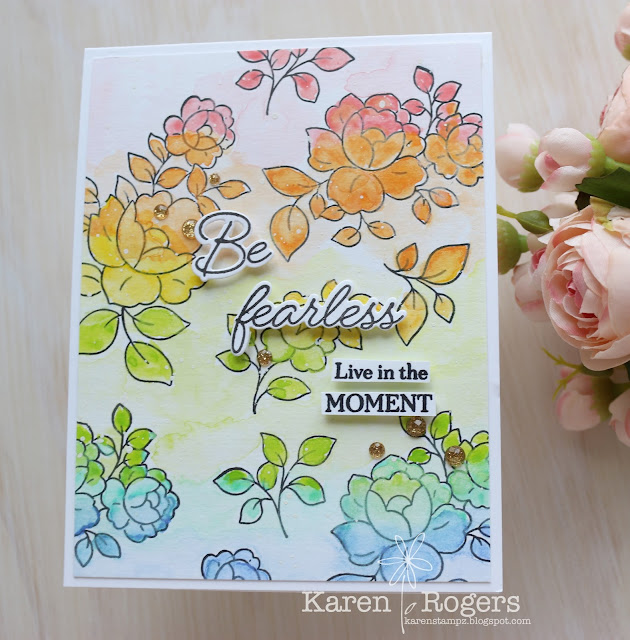
This is the name of a new Pinkfresh Studio stamp set which was only officially released June 1st, 2024. Imagine my delight to have received the stamp set in my Creative Art Retreat box from  Jenn Shurkus pre-release, I'll have to wait a few months for the dies, stencils and press plate to arrive down under to buy them but as you can see below you just need the stamp though Jenn and her team have stamped and die cut out the Be Fearless for us and it wouldn't look as pretty if I had to do it by hand.

Jenn's Creative Journey Art box truly is a retreat the majority of our panels are cut, images are stamped and die cut so we just have to make pretty backgrounds and colour things which equals my happy place! The retreat is over 2 days with 2 sessions each day, both being 3 hours long. Normally the first day you spend time making backgrounds and colouring things, day 2 you make cards. This year we actually had to do some home work and stencil 4 panels with the Luna Paste we received using 3 different stencils we also received so they would be dry in time to colour up in class.

Well I'm working at my own pace and I have finished session one day 1 and unlike other events we haven't Copic coloured anything yet, we've being doing backgrounds and colouring with Distress Watercolor Pencils, also unlike other retreats of Jenn's we actually have a finished card after session one. You would have had to have done other events with Jenn to know that this is incredulous!

Anyhow onto the card where we have stamped the images from the stamp set randomly over a piece of Distress Watercolor paper with a waterproof ink.


We have then loosely coloured in the images with the distress pencils and then when dried coloured in with an even lighter wash.

Colours used for flowers: Saltwater Taffy, Dried Marigold, Spiced Marmalade, Sweet Mustard, Twisted Citron, Salvaged Patina, Shaded Lilac.

Same colours used for wash except no Spiced Marmalade and Squeezed Lemonade used instead of Sweet Mustard.

When dried we have trimmed an 1/8" each of all sides from the A2 panel or could be 1/4" inch of top or bottom and a 1/4" off one side but finishing off with a 4" x 5-1/4" panel to add to our card base. Sentiments been popped up with tiny bits of foam and a few gold glitter drops from Pinkfresh Studio to complete the card.

I'm actually feeling a bit overwhelmed with getting behind on Virtual classes in a box but this event is definitely my top pick for events to do if you are lucky enough to get in!


✿Karen✿